• blog
  • about
  • Email List
  • Archives
Menu

HAZEL HAUS

Street Address
the best things in life are edible
Phone Number
A Food + Travel Blog

Your Custom Text Here

HAZEL HAUS

  • blog
  • about
  • Email List
  • Archives

Funfetti Hand Pies With Raspberry Filling

November 6, 2023 Jenna Hazel

The idea for these funfetti hand pies came from a childish desire to play with color. I’ve always loved anything funfetti. The colors just call to me. When I saw A Moment Of Sugar throw some sprinkles in her pie dough I was immediately taken aback. It spoke so dearly to my inner child — the one that craves creativity. I knew I had to create a version that incorporated those bright colors as well. So here we are.

Let me just say that these hand pies are a project. There is no instant gratification to be found here. The dough needs time to rest and the rolling out of the dough takes a hot minute. But, let me also say that the results are worth it. If you hold steady until the end you will have a plate full of very impressive hand pies ready to show off at your next gathering. Let’s jump in.

Funfetti Hand Pies With Raspberry Filling

Makes 12 hand pies

For the Crust:

  • 3 cups all-purpose flour

  • 2 tablespoons granulated sugar

  • 1 ½ teaspoon salt

  • 1 ½ cups unsalted butter, chilled, cut into 1-inch pieces

  • 1 tablespoon apple cider vinegar

  • ⅓ cup ice water

  • 1/4 cup sprinkles, I used these

For the Filling:

  • 10 oz frozen raspberries

  • ¼cup sugar

  • 1 tablespoon cornstarch

  • 1 tablespoon lemon juice

  • 1/2 cup Water, divided

  • 1 teaspoon vanilla

  • 1/2 teaspoon salt

For the Topping

  • 1 egg

  • turbinado sugar

Make the crust:

Combine flour, sugar and kosher salt in a large bowl, and use your hands to mix well.

Add the butter to the bowl, and use your palms and fingertips to smash the pieces into the flour until you’ve got large, flat butter pieces that are evenly distributed among the flour. Pop the bowl into the freezer for 5 or so minutes.

Add the sprinkles to the flour mixture and gently incorporate.

Combine vinegar and 1/3 cup water, and drizzle over the flour-butter mixture. Like you’re running your hands through sand, deliberately yet delicately mix the water into the flour/butter mixture. Resist the urge to add more water until you see that it’s absolutely necessary, and even then, use only an additional tablespoon or two.

Turn the dough out onto a work surface, and use your palms to knead it lightly until the shaggy ball transforms into a slightly-less shaggy ball of dough. (It should still be relatively shaggy.) Pat the dough into a disc about 1 inch thick, rotating it to create a nice circle. Wrap in plastic or place in a resealable plastic bag and chill until firm, at least 2 hours. The dough will hydrate a bit as it sets in the fridge so do not be alarmed at the shagginess of the dough.

While the dough rests make the filling.

For the Filling:

In a saucepan, over medium heat, add the raspberries, sugar, lemon juice, and 1/4 cup water. Cook on low to medium heat until all the sugar has dissolved. Stir periodically to ensure the mixture incorporates.

Make a cornstarch slurry by combining the remaining 1/4 cup water with cornstarch. Add it to the raspberries. Continue to cook on medium heat until the filling comes to a boil and becomes thick and glossy. Remove and let cool for a while. All to full cool before using to assemble to pies.

Assembling the pies:

Preheat the oven to 425. On a lightly floured work surface, roll the dough into a 9 x 13 inch square-ish shape or until it is about 1/4 inch thick. Cut the dough into 3” squares using a pastry knife or bench scraper. Transfer 6 pieces of dough to a baking sheet. This will be the bottoms of your pies. Then place 1 tablespoon of filling on each bottom.

The next part can feel intimidating, but I promise, it’s not as hard as it looks. And if all else fails here is a video to guide you. Cut some of the rolled out dough into thin 1/4” thick strips. Lay 3 strips ontop of the pie going diagnol one direction and the other 3 diagonal the other direction. Then weaves the strips of pie dough under one another as if you were weaving a basket. The video shows this well. Cut the excess pie crust with a bench scraper to create a nice sealed edge.

Whisk the egg with a teaspoon of water and use it to brush the crust. Sprinkle with turbinado sugar. Optional, but it enhances the texture of the pie so much.

Place the hand pies in the oven and bake until the crust is deeply golden brown. About 12-16 minutes.

Remove pies from the oven and let cool completely before eating.

Note: Alternatively to doing the lattice topping you could just cut another 3” square piece of pie dough and press it to the bottom pie dough using a fork. This is an equally pretty technique that might seem less intimidating.

In Food: More Sweet Things
Comment

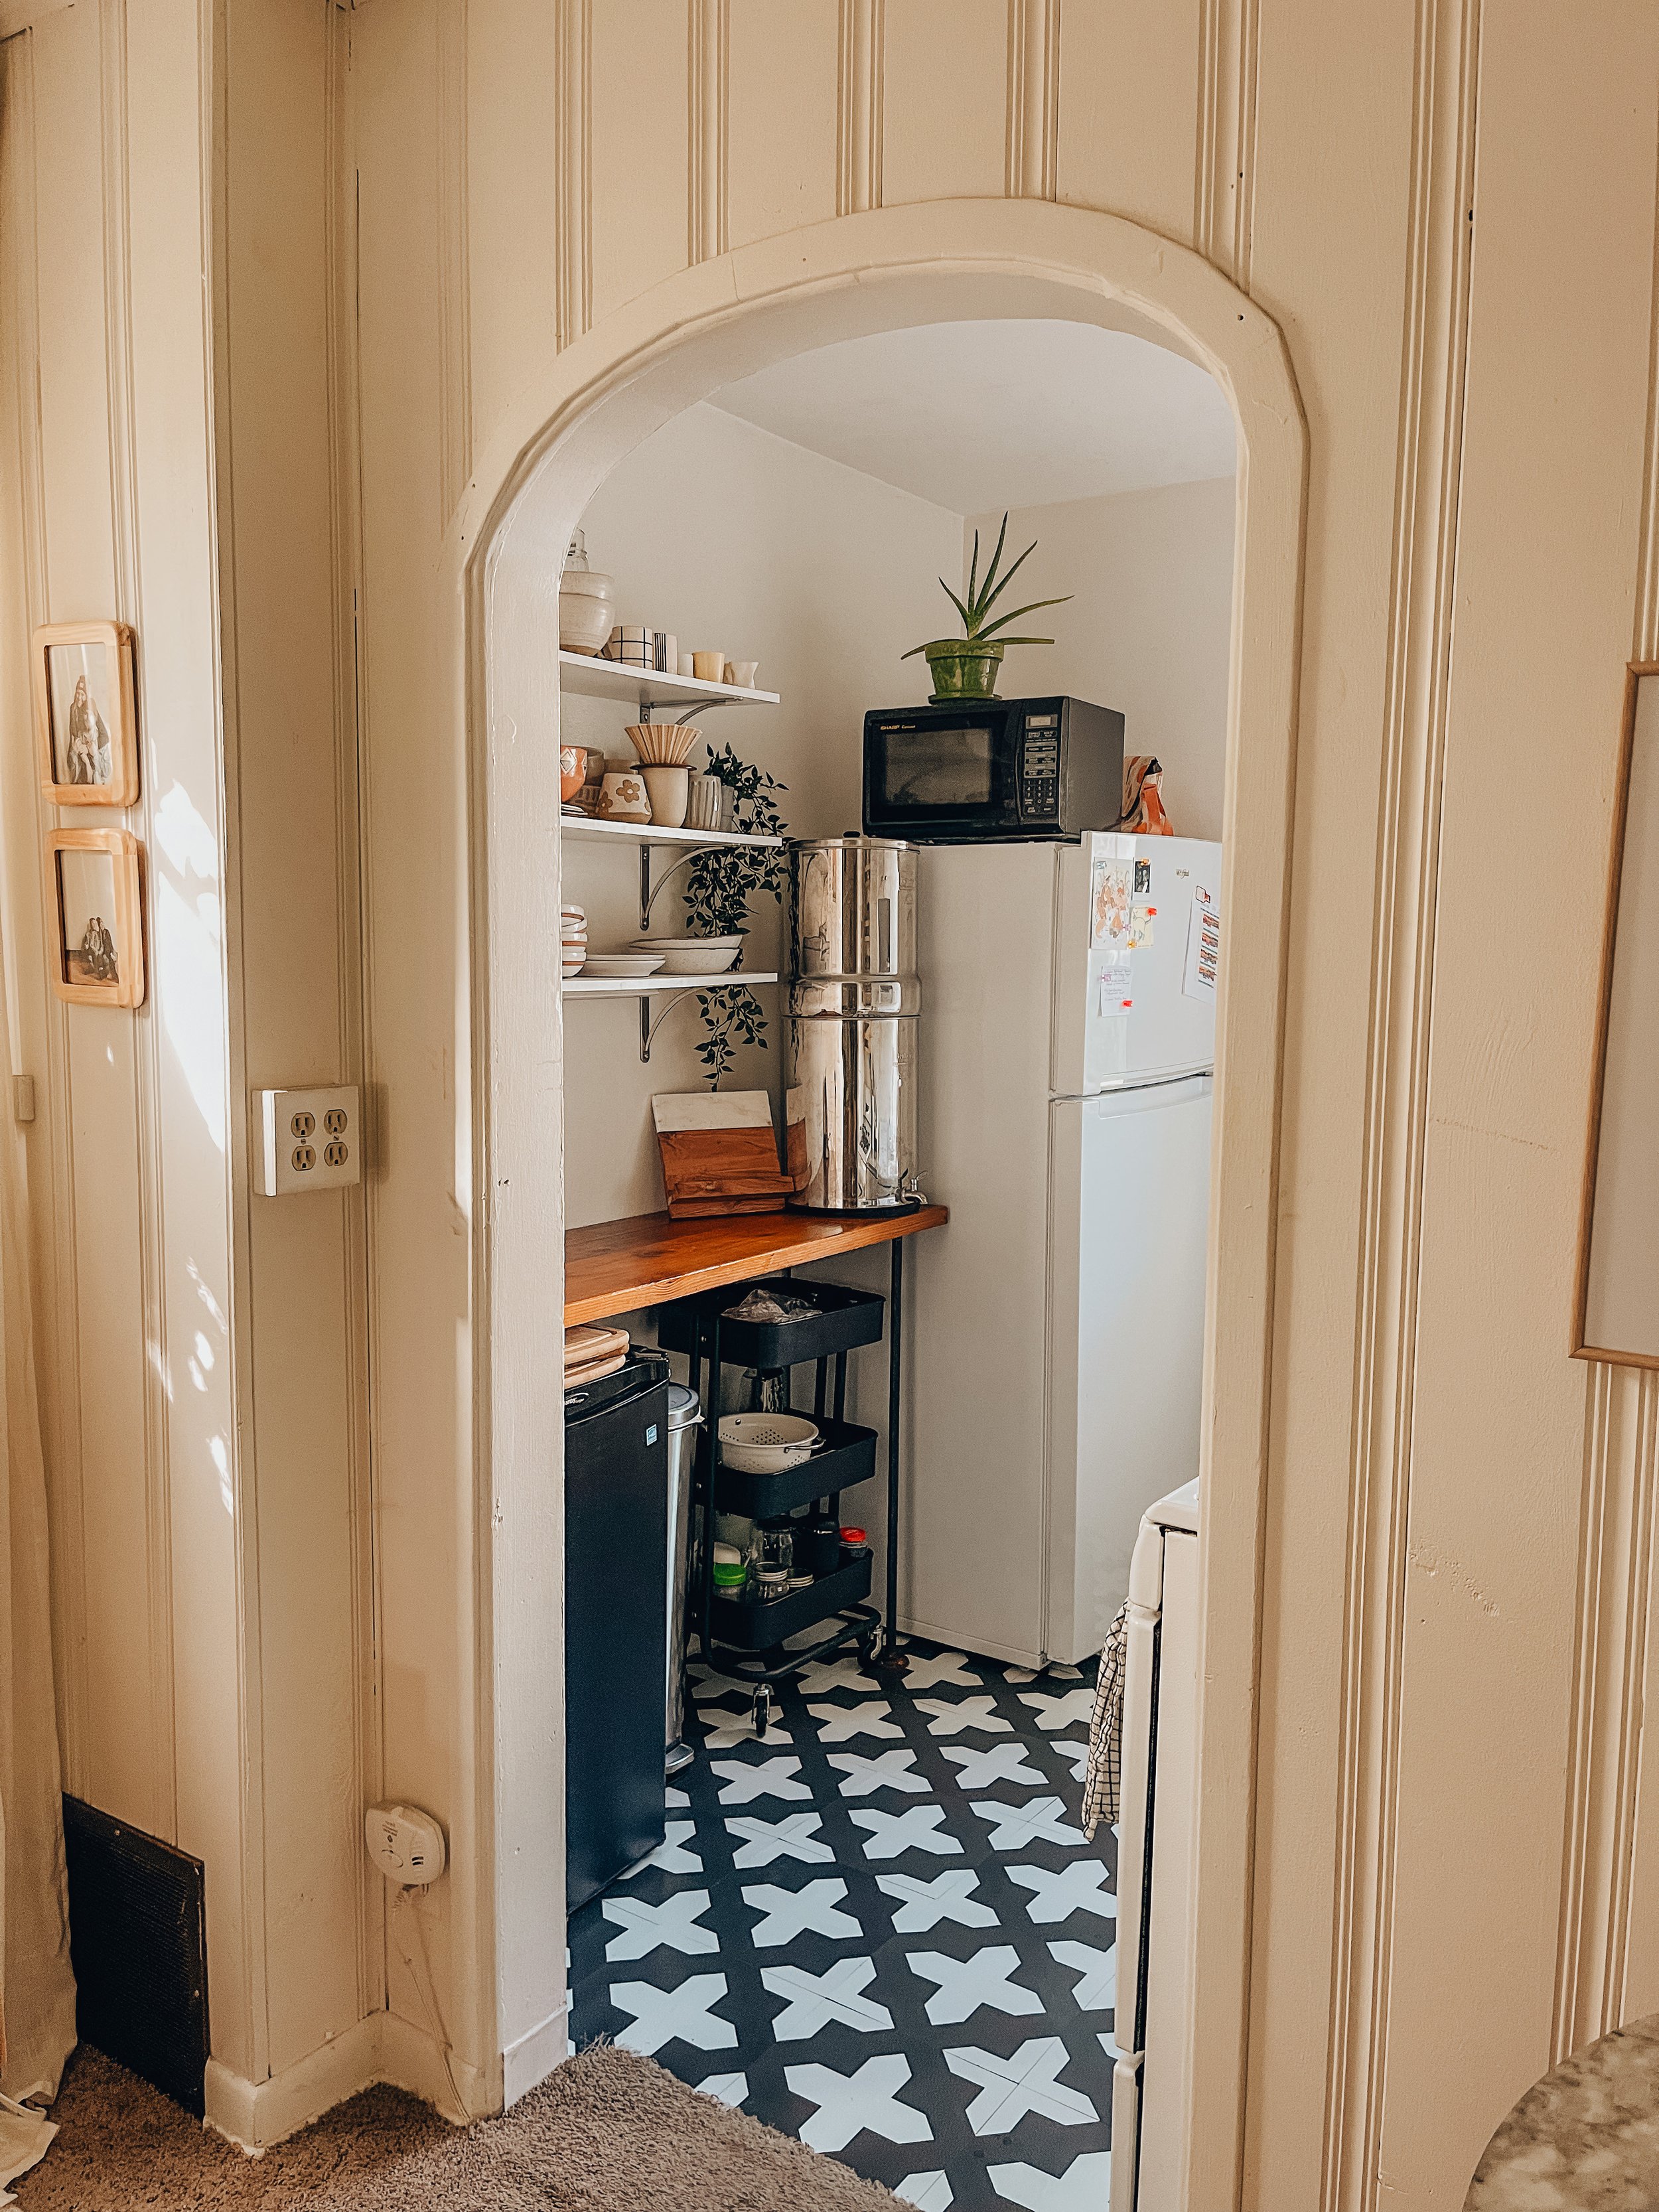
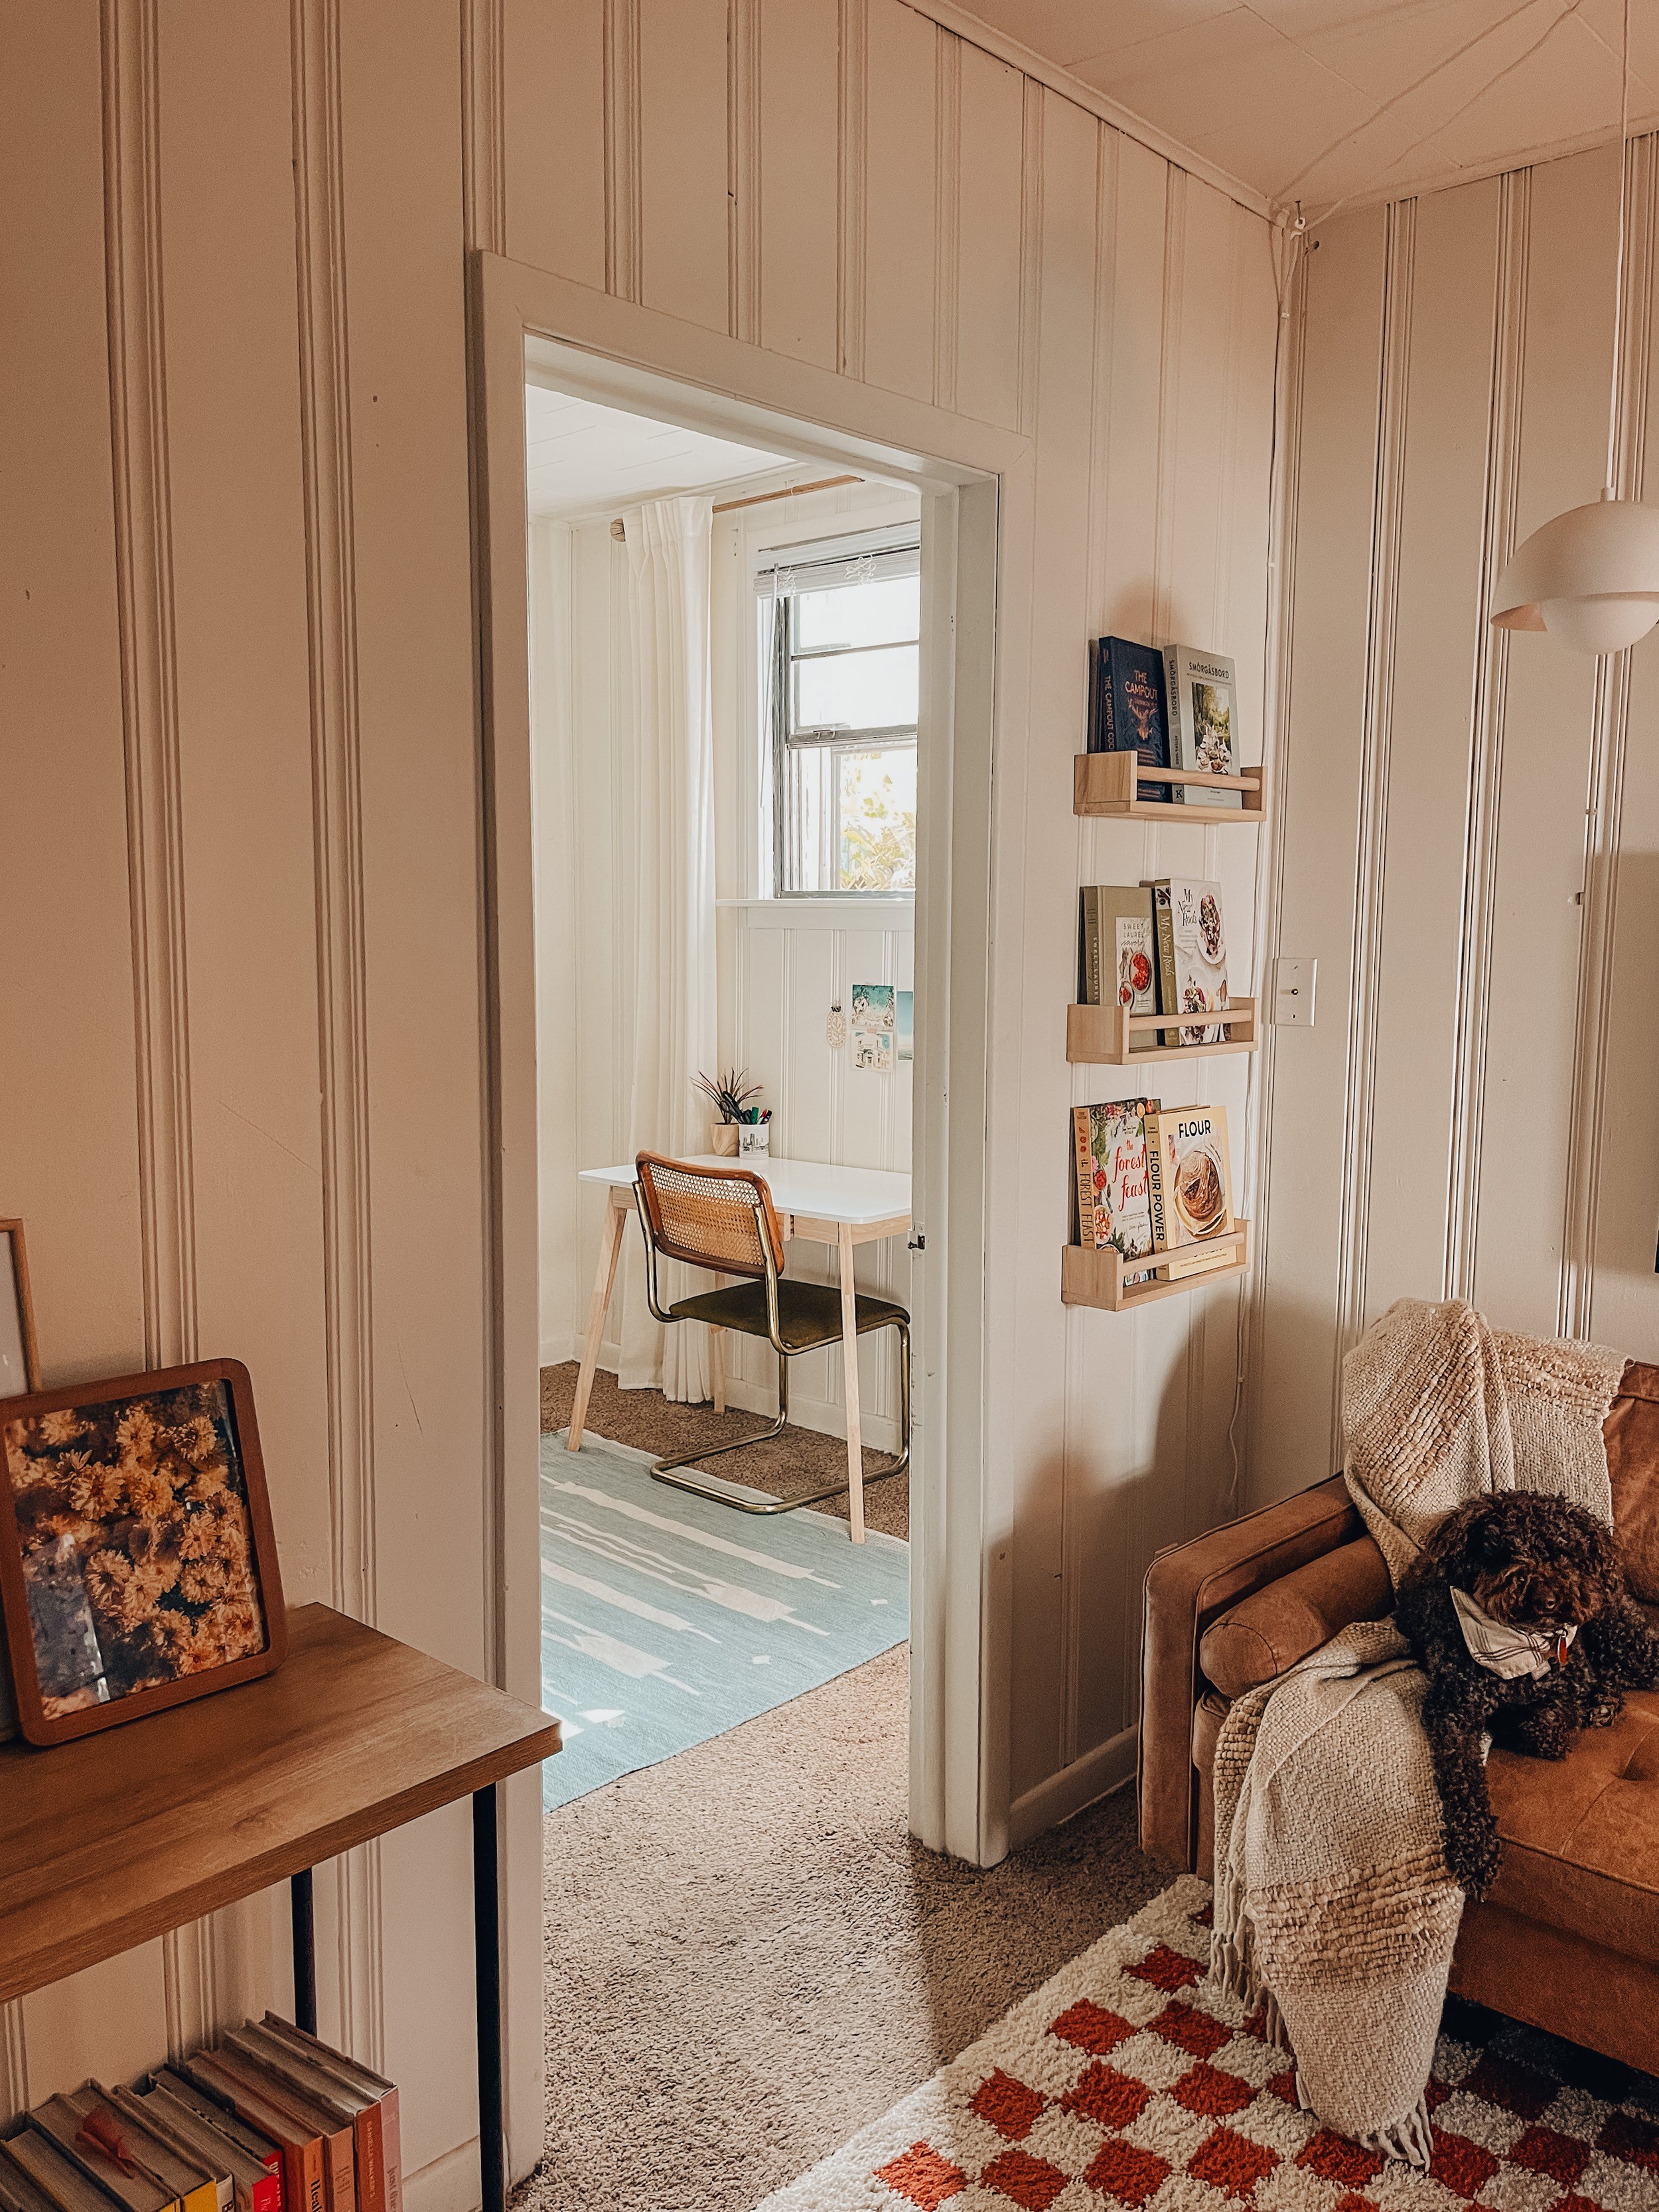
A Peek into Our Tiny Apartment + Words On Living in 360 Square Feet

October 29, 2023 Jenna Hazel

Well hello there!

I knew the nosy part of you just wouldn’t be able to stay away. I’m nosy too. I always find it fascinating to see how other people live. I am a sucker for a house tour or those “Day in the life..” posts. I just find it super interesting. We only get this one life so we don’t generally have enough time to experiment with a lot of different lifestyle possibilities, so living vicariously through someone for a bit is fun. To help you live that tiny-space life without having to live the tiny-space life here is a glimpse inside our 360 square foot apartment in Omaha, Nebraska. I’m sharing a little bit of why we live here as well as some things we like and some things we don’t. I hope you enjoy.

Why Are you living in 360SF?

It feels relevant to address the reason why we are currently living in a small space. The answer isn’t straight forward so I’ll back up and start from the beginning.

Two years ago we wanted to sell our Omaha house in hopes of both leaving Omaha, Nebraska and simultaneously freeing ourselves of the responsibilities of home ownership. At the time that we were looking to sell, our friends were contemplating turning their then Airbnb into a long-term rental. The stars aligned. We sold anything that wouldn’t fit into the 360sf Airbnb apartment and moved in that October.

When we discussed with out landlords / friends the idea of us moving into their Airbnb, we had initially thought we’d live there for maybe six months and then head off on our next adventure. As fate would have it, a few months after we moved into the apartment Josiah got a job here in Omaha that he is head over heels for — decreasing our desire to relocate at this time. Once we started to settle into the space we decided that we actually really loved the simplicity it brought us and have now been calling it home for the last 2 years with no immediate plans to move.

As you’d expect though, living in a tiny space comes with its pros and cons. There are definitely some things we love about it and some things we don’t love.

Things we love about living in a small space

Less Time to Clean

I remember dreading cleaning our old house because it would take half the day if I really wanted it to feel super clean. Now it takes us about 20-30 minutes to do a deep clean of the apartment which gives us so much of our time back to do other things.

Financial Freedom

Our rent, utilities, internet, etc. is all rolled into one, fixed monthly payment that we make to our landlords / friends which has been really nice for us. This generous deal has allowed us to pursue our financial goals and we are now 99.9% debt free (just a few more car payments!) which is the most incredible feeling. And we were able to accomplish that while still going on crazy adventures since we were living in our tiny, more affordable space.

More Travel

This is probably the reason that keeps me in this tiny apartment the most, but living in this space has allowed us to travel more. With the money we’re not spending on our apartment/house we’re able to set that aside for travel. We’ve been able to go to Puerto Rico, Hawaii, Portugal, and many more places over the last two years with the money we’ve been saving.

Less Things

The reality of living in 360sf is that you can not have as many things as you could if you lived in a larger space. This makes the art of appreciating something, but not feeling the need to own it, a necessary practice. I am not perfect at, but living in a tiny space has forced me to be more conscious about my purchases. This saves money and time because we really can’t spend a lot of time shopping.

No Maintenance / responsibility

One thing that had really started to get to us about home ownership was the maintenance and unexpected expenses that were constantly coming up. We had a super old house and there was always something that needed fixed. Although I’m happy we were able to experience home ownership we are really glad to not have those responsibilities right now. Aside from cleaning our apartment weekly our landlords take care of everything — garbage, mowing the lawn, pulling weeds, etc. This saves us a lot of time, energy, and money which is perfect for the current goals that we have.

Less Stress

All the above reasons have lead to decreased stress in our lives which is a huge win all around.

Things we don’t love about living in a small space

Small Kitchen

With the amount of cooking I do the kitchen space is a challenge, but since Josiah and I have been married we’ve lived in almost 9 apartments/houses and although I wish it was bigger I have found a groove. I do still wish there was more cabinet space.

QUICKLY cluttered

If one things is out of place the apartment can start to feel really cluttered quickly. When we are on our best game we try to put everything away pretty immediately when we’re not using it to avoid this, but when we slip up in this area it definitely shows quickly. This is most evident when we get back from a trip and bring all our stuff in at once.

Hard to host

Not surprising, but 360sf isn’t great for hosting people. This is definitely a con, but we have found ways to host our friends on our patio if the weather is good and sometimes we just get cozy and all hang out inside anyway. Still it’s definitely a drawback of living in a tiny space.

Harder to Have alone time

This one can be tough for us because I like to have a decent amount of alone time. In such a tiny space you don’t really have another area of the house to hide out in. This was definitely a pain point for us in the first year of living here. I’ve started to retreat to the kitchen and put my Airpods in when I feel like I need some alone time which helps me feel like I have a little separation (even if Josiah and the dogs are actually only like 10 feet away). It’s definitely not the same as having a separate area of the house though.

how long will we keep doing this?

Right now we’re happy. Josiah is in school so for now financially staying in our tiny apartment works. I’m not sure what we will do when he is done, but what we do know after living tiny for two years is that we want to continue to strive for simple so that we can keep moving towards the things that bring us joy.

Thanks for hopping over and taking a look around. I know living in a tiny space is not for everyone and that is 100% okay. I hope you enjoyed getting a glimpse inside our space and seeing a little behind the scenes of our life. Drop whatever questions you have below!

In Life
Comment

No-bake Cookie Bars made with all Natural Ingredients (GLuten-FRee + Dairy-Free)

October 23, 2023 Jenna Hazel

These no-bake cookie bars started as my go-to when I needed to bring a dessert where there were going to be a variety of diet restrictions. The recipe is dairy-free and gluten-free which makes it easy for those with restrictions to enjoy without worry. However, they are so dang delicious that they quickly evolved into a dessert that I bring everywhere — regardless of dietary restrictions. It is without a doubt the recipe I’ve been asked to share the most. So it feels right to share it with all of you.

These no-bake cookie bars are a nod to the deliciously, chocolatey and peanut-buttery goodness that I grew up making, but using all natural ingredients. Using just coconut oil, peanut butter, maple syrup, cocoa powder, and oats I feel transported back to those one-pot treats, but get to enjoy ingredients that I feel good about treating myself to on the regular.

I am certain you’re going to enjoy this recipe and it will find itself in a consistent rotation in your home.

No-Bake Cookie Bars

Bottom Layer:

  • 1/2 cup + 2 tablespoons of coconut oil

  • 1/4 cup peanut butter, the drippy natural kind with only salt and peanuts as the ingredients

  • 1/2 cup maple syrup

  • 1/2 cup cocoa powder

  • 1/2 teaspoon salt

  • 1 teaspoon vanilla

  • 2 1/4 cup rolled oats, these are my favorite

Top Layer:

  • 2 tablespoons coconut oil

  • 1/2 cup peanut butter

  • 2 tablespoons maple syrup

Line a 9x9 pan with parchment paper.

Bottom Layer: First, you’re going to make the bottom layer so follow the ingredient measurements listed under “bottom layer’. Grab a medium saucepan and add in the coconut oil, peanut butter, and maple syrup. Heat the saucepan over medium-low heat until the ingredients have melted. Whisk to combine the ingredients. Whisk in the cocoa powder, salt, and vanilla. Stir in the oats. Press the cookie mixture into the 9x9 pan and place in the freezer while you make the top layer. It will need to be in there about 15-20 minutes or until they have set up enough to put the top layer.

Top Layer: Now you’re going to make the top layer. Combine all the ingredients listed under '“top layer” into a small saucepan and heat until melted. Whisk to combine.

Remove the bottom layer from the freezer and if you can touch it without getting chocolate on your finger then it is ready to be topped. Spread the top layer onto the bottom layer. Place back in the freezer until the top layer is fully set. Cut into squares and serve.

Because of the coconut oil these will melt quickly at room temperature so I recommend keeping them in the freezer or fridge.

In Food: Brownies + Cookies, Food: More Sweet Things
Comment

Mom’s Chicken Tortilla Soup + My New Must-Have Ingredient

October 16, 2023 Jenna Hazel

Confession, I’ve stopped buying chicken stock. It used to be a staple I’d pick up when we were at costco to be able to whip together soups in a pinch. BUT I’ve discovered something even better and you can still find it at Costco. I started using Better Than Bouillon which is essentially a concentrated chicken stock. It comes in a jar and you just scoop out a little bit, mix it into a little water to dissolve it, and BAM you have instant chicken stock that is far more flavorful than the boxed stuff. Bonus, it takes up way less space than cartons of chicken stock do (which is a major win for someone who lives in a very tiny space.) I promise, once you buy it you’re never going to go back to buying the cartons. Moving on to the reason you really came over here —the soup.

When we were visiting my family three years ago my mom made this Chicken Tortilla Soup and it transported me back to coming home from school and smelling something yummy simmering on the stove. I have many fond memories of my mom making this soup, but until we had it again three years ago I hadn’t used it in my own recipe rotations — maybe it’s because certain things just taste better when your momma makes them. Here nor there, for the times I can’t have my mom make this soup I asked for the recipe so that I could attempt to recreate a little bit of that comfort in my own kitchen and it’s been on repeat since then. And I know you all love a good soup that is simple, hearty, and super cozy I figured I’d share it with you all too.  The recipe can easily be adapted to swap zucchini for another type of squash, the red pepper for any other colored pepper, and so on and so forth.

Mom’s Chicken Tortilla Soup

  • 4 tablespoons olive oil 

  • 12 ounces of frozen corn

  • 1 small zucchini, diced 

  • 1 medium onion, diced 

  • 3 cloves garlic, minced

  • 1 red pepper, diced

  • 1 lb chicken breast (cut into cubes) 

  • 2 teaspoons cumin 

  • 2 teaspoons poultry seasoning 

  • 8 ounce can of tomato sauce 

  • 28 ounces stewed tomatoes

  • 3 cups chicken stock or bone broth, I’ve started using this instead of chicken stock and it’s heavenly

  • 1 tablespoon adobo sauce 

  • Salt and pepper to taste 

    Take a large pot and place it over medium-high heat. Drizzle 2 tablespoons of the olive oil and allow the olive oil to heat. Then add in the zucchini, onion, garlic, and pepper and sauté them for about 5-7 minutes. Drizzle in the remaining 2 tablespoons of olive oil and then add in the chicken, cumin, and poultry seasoning. Allow to cook for about 7 minutes longer. Then add in the tomato sauce, stewed tomatoes, chicken stock, corn, and adobo sauce. Allow to simmer for several hours, but if you don’t have the time just allow the soup to heat and serve as is. We’ve eaten both ways and it’s delicious no matter what, but if you have the time the extra simmer time really brings out the flavors.

    Serve with cilantro, sour cream, tortilla chips, cauliflower rice, regular rice, or whatever floats your boat! Store in the fridge for up to 5 days.

In Food: Soups + Salads
Comment
← Newer Posts Older Posts →
 

Hi! I’m Jenna — a creator, photographer, foodie, + travel enthusiast trying to bring some light and joy to this space! Welcome to my little corner of the internet where I share all things food + travel. Pour yourself a cup of coffee and take a look around!

GET ON THE LIST

Stay in the know! Sign up to be notified of new posts + get email exclusive content!

Your inbox will thank you.

Thank you!
To give Thanksgiving the respect it deserves I’ll keep the recipe for these slightly more Christmas-y cookies on lock down a week longer, but after that it’s free game. 🍪

If you’d like the recipe for these Rosemary Brown Butter Ch
A GIANT PUMPKIN POP TART WITH A BROWN SUGAR ICING is live on the blog! ✨

With Thanksgiving arriving in less than 2 weeks I’ve been dreaming up a dessert that feels like a good balance of both fun and tradition. This giant pumpkin pop tart brin
I had the best weekend eating (+ drinking) my way around Chicago! ✨ It always makes me so happy to be back in this city that grew me so much in my early 20’s — what a privileged to return and reflect on the ways I’ve grown and chang
NEW BLOG POST: Our favorite coffee, food, + sights in Omaha, Nebraska. 

There are truly so many places we love in Omaha! After living here for 6 years it felt like time to round up our top picks and share it with all of you. Hop over to the blog to
Fall in the neighborhood. ✨
Broccoli, couscous, pistachios, pumpkin seeds, + feta tossed with a lemon turmeric dressing for a nourishing lunch. ✨
A quick little 24 hour trip to hang with my mom. ❤️
Harissa chicken hummus plates ✨
Back on my Greek omelet kick! They’ve been such a great breakfast that has felt both fresh and nutritious! 

I added Kalamata olives, tomatoes, mint, basil, and feta in this time, but it could easily maintain the Greek vibe with some red bell p