• blog
  • about
  • Email List
  • Archives
Menu

HAZEL HAUS

Street Address
the best things in life are edible
Phone Number
A Food + Travel Blog

Your Custom Text Here

HAZEL HAUS

  • blog
  • about
  • Email List
  • Archives

A Giant Pumpkin Pop Tart with a Brown Sugar Icing

November 18, 2024 Jenna Hazel

With Thanksgiving arriving in less than 2 weeks I’ve been dreaming up a dessert that feels like a good balance of both fun and tradition. This giant pumpkin pop tart brings the drama but fulfills that classic pumpkin pie craving all the same. The brown sugar icing makes it feel like an even more decandent dessert than your classic pumpkin pie, but the fact that it’s honoring your childhood pop tart dreams makes it casual and playful — the perfect treat to round out your dessert spread.

A Giant Pumpkin Pop Tart with a Brown Sugar Glaze

Recipe for the crust is slightly adapted from Ambitious Kitchen

The Crust:

  • 1 cup (226g) unsalted butter

  • 2 1/2 cups (300g) all-purpose flour, plus additional for dusting

  • 1 teaspoon salt

  • 2 teaspoon sugar

  • 3-4 tablespoons ice cold water, plus more if necessary

The Filling

  • 1 1/2 cups pumpkin purée

  • 1 large egg

  • ½ cup firmly packed brown sugar

  • 1 and ½ teaspoons pumpkin pie spice

  • ¼ teaspoon salt

Egg Wash:

  • 1 egg

  • 2 Tablespoons water

Brown Sugar Icing

3/4 cup brown sugar, packed

  • 1/4 cup milk + 2 Tablespoons to thin out at the end if necessary

  • 1 Tablespoon butter

  • 1/2 teaspoon pure vanilla extract

  • 1 and 1/2 cups powdered sugar

  • pinch of salt

Making the crust:

Before you make the crust, cut the butter for the crust into small cubes and set on a plate. Place in the freezer for 15-30 minutes so it gets VERY COLD. While you do this, you can get all of your other ingredients out and ready to go.

To make the crust: Add the flour, sugar and salt to a food processor and pulse a few times to combine. Add the VERY COLD butter cubes and pulse again for 20-30 seconds until pie dough starts to resemble tiny peas.

Next, add in 2-3 tablespoons ICE COLD water to the dough. Pulse until dough comes together just a bit, resembling small beads. The dough should still be somewhat crumbly; I recommend squeezing a small amount of dough between your fingers; it should stick together well, but if it doesn’t and is very crumbly, add more ice water, 1/2 tablespoon at a time, until it just comes together. If your dough is too wet, add 1/2 tablespoon flour until it comes together. Do not overwork the dough.

Place dough onto a well-floured surface and divide in half to form into TWO disk shapes, then wrap with plastic wrap or in a reusable bag. Chill in the fridge for at least 30 minutes-1 hour or up to 2 days. Dough can also be frozen for up to 2-3 months if well wrapped in both plastic and then foil.

Once dough has been chilled for at least 30 minutes, place dough on a VERY well-floured clean surface and use a well floured-rolling pin to roll the dough into two roughly 12”x8” rectangles. Trim the extra crust around the edges of the pie plate and discard excess dough. . Cover the pie crust tightly with plastic wrap and place pie pan in the refrigerator while you prepare your pie filling.

Making the filling:

Preheat the oven to 375 degrees while you’re making the filling.

In a large bowl, whisk together the pumpkin purée and egg until smooth.

Add the brown sugar, pumpkin pie spice, and salt, and whisk again until everything is combined. Set aside.

You’re only going to use 3/4 of the pumpkin pie filling and then feel free to freeze the rest.

Putting it together:

Remove one of the pie crusts from the refrigerator and place on a baking sheet lined with a piece of parchment paper.

Whisk a large egg with 2 tablespoons of water. Use a pastry brush to brush the outside inch of dough on the baking sheet with the egg wash. Spread 3/4 of the pumpkin pie filling in the center of the bottom crust, leaving about a 1 inch border on all sides.

Remove the second pie crust from the fridge and place it on top of the filling. using your fingers to slightly push dough together around the edges. Use a large fork to make indents along the border of the pop tart, then poke fork lightly in the center of the pop tart to allow air to escape.

Brush the whole top of the pop tart with the remaining egg wash if using. This will give your pop tart a pretty shine.

Bake for 20-22 minutes, until the dough is light golden brown. Allow to cool while you make the glaze.
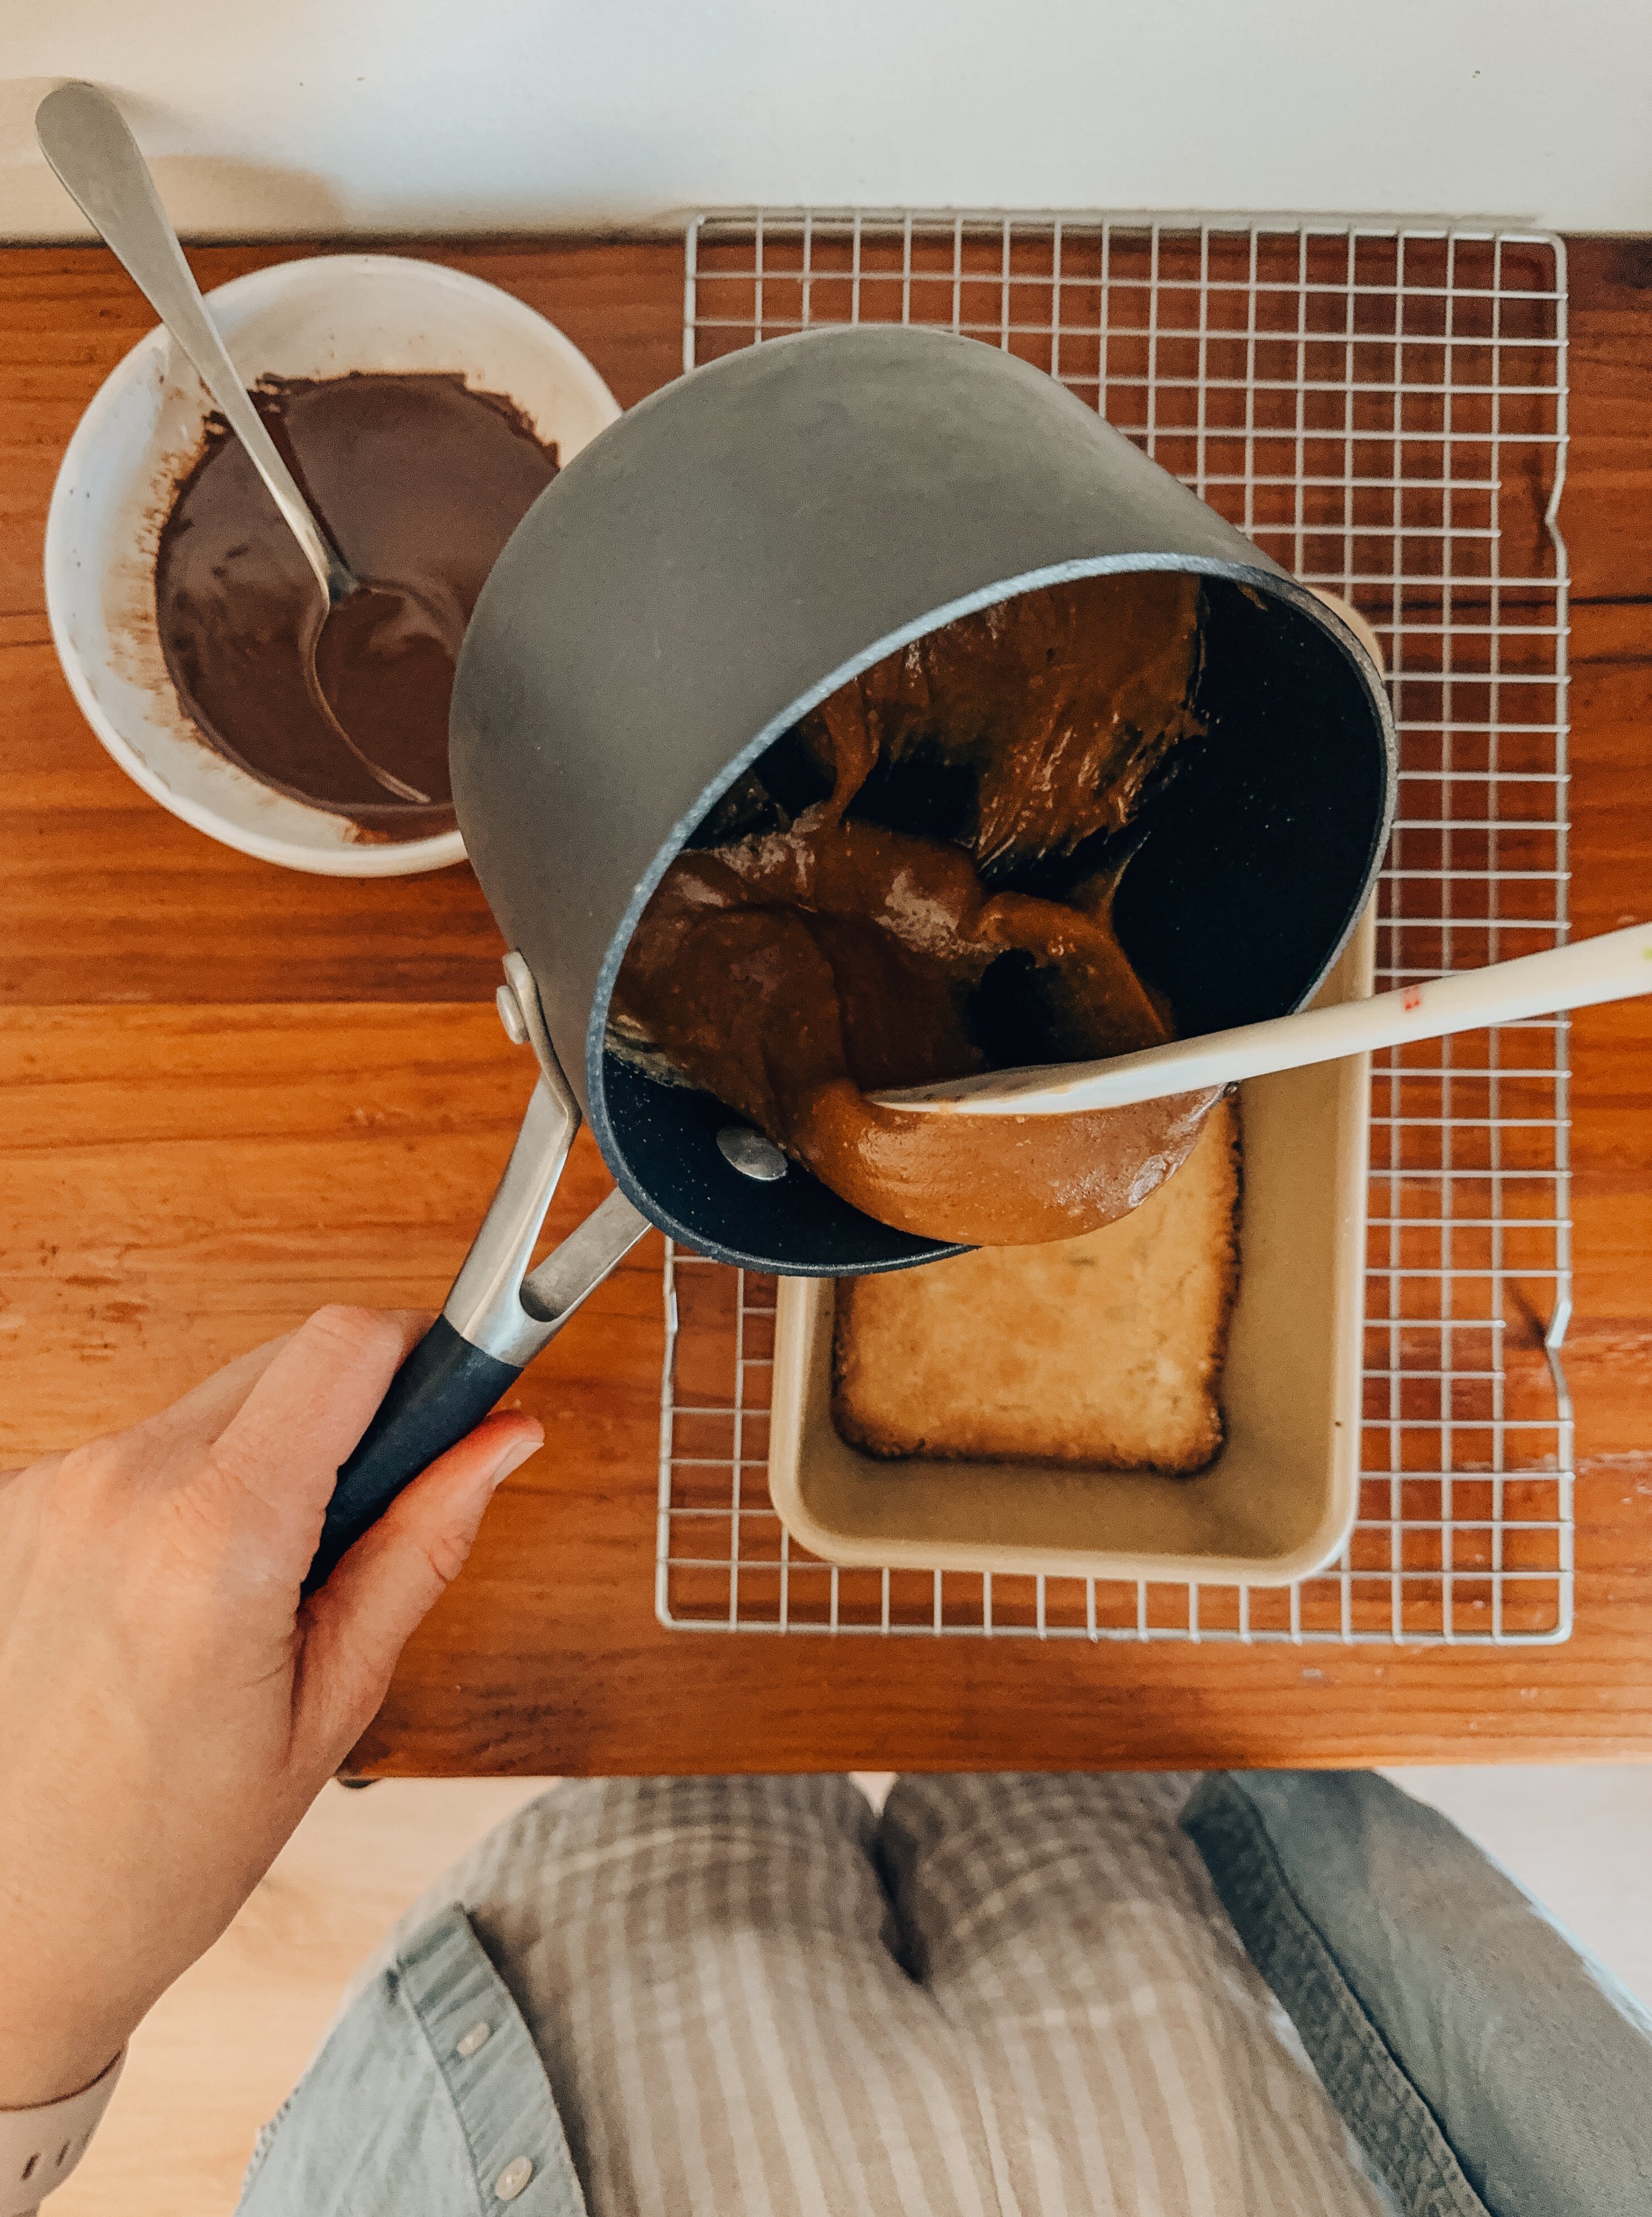
Making the icing:

In a medium saucepan on medium heat, warm the butter, brown sugar and milk together. Whisk together until combined and bring to a slow simmer. Let simmer for about 1 minute then remove from the heat. Add the vanilla and the powdered sugar, whisk together until smooth. If this feels too thick for your liking go ahead and add in 1-2 tablespoons of milk to thin out the icing.

Once the Pop Tart is completely cooled cover it with icing. Use as much icing as your heart desires. I used about 3/4 of the icing, but you do what feels right to you. Allow the icing to set and then serve.

In Food: More Sweet Things
Comment

Peanut Butter Twix Bar (Dairy-free + Gluten-free)

July 18, 2024 Jenna Hazel

If I had to pick a candy bar to eat for the rest of my life I would probably pick a Twix. They’re just so delicious — the caramel, the shortbread, the chocolate — all of it. It provides such a satisfying crunch while also delivering the perfect caramel to chocolate ratio. Seeking out a healthier alternative for my candy bar of choice, I came across Rachael’s Good Eats healthier Twix Bar. I made a handful of tweaks to eliminate the need for coconut flour as it’s not my favorite texture or flavor and then decided to use my peanut butter caramel in place of an almond butter based caramel. What I ended up with was a dessert that I am consistently stocking my freezer with and i am certain after you try it you will be too.

Peanut Butter Twix Bars

Inspired by Rachael’s Good Eats

Makes 20 bite size bars

Shortbread Layer:

  • 1 cup almond flour

  • 1 1/2 tablespoon maple syrup

  • 1 1/2 tablespoon coconut oil

  • 1/4 teaspoon salt

  • 1/2 teaspoon vanilla

Caramel Layer:

  • 1 recipe of my peanut butter caramel sauce

Chocolate Layer:

  • 1/2 cup semi-sweet chocolate chips

  • 1 teaspoon coconut oil

Flaky sea salt for topping, optional

Make the shortbread layer: Preheat the oven to 350 degrees. Grease or line a 9 x 5 pan with parchment paper (a standard bread pan). Set aside. In a large bowl, combine all the shortbread ingredients until well combined — ensuring there are no dry spots remaining. Transfer the mixture to the greased pan and pat down in an even layer. Bake for 10 minutes or until golden brown on the edges. Set aside and allow to cool completely.

Make the Caramel Layer: Follow the direction for the caramel in this blog post. Allow the caramel to cool completely before spreading it evenly on top of the shortbread layer. Place the baking dish in the freezer and allow the caramel to harden (about 1-2 hours).

Make the Chocolate Layer: Place the chocolate and the coocnut oil in a microwave safe container and microwave in 30 second intervals, stirring between, until the chocolate chips have fully melted.

Putting it all together: Pour the chocolate onto the hardened caramel in an even layer. Sprinkle with flaky sea salt. Return to the freezer for another 10-15 minutes until the chocolate hardens. Remove from the freezer and slice the bars into 1/2” pieces widthwise and then cut each piece in half. Store in an airtight container in the freezer or refrigerate for up to a month.

In Food: Brownies + Cookies, Food: More Sweet Things
Comment

Rhubarb Berry Crumble Bars (Gluten-Free + Dairy-Free)

May 6, 2024 Jenna Hazel

Rhubarb continually steals my heart. The tartness it brings just makes me really, really happy It makes me happy. So when I stopped in a new Micro Market last weekend and saw some rhubarb, I immediately snatched some up and started dreaming up a dessert for some friends that were coming over. Classically strawberries pair really well with rhubarb, but I had a variety of mixed berries on hand so I decided to go that route and it was a great move. These bars come together quickly and feel just indulgent enough to call a dessert, but could easily be excused as a quick breakfast if paired with some yogurt. I hope you all enjoy!

RHUBARB BERRY CRUMBLE BARS

Adapted from Ambitious Kitchen

For the crust and crumble:

  • 3 cups gluten free oat flour

  • 2 cup old-fashioned rolled oats

  • 1 cup packed brown sugar

  • 1 teaspoon ground cinnamon

  • 1/2 teaspoon baking soda

  • 1/2 teaspoon salt

  • 1 cup coconut oil, melted

  • 2 teaspoon vanilla extract

For the filling:

  • 3 1/2 heaping cups fresh or frozen mixed berries

  • 1 1/2 cup rhubarb, chopped

  • 6 tablespoons pure maple syrup

  • 3 tablespoons cornstarch

  • 1/2 teaspoon vanilla

  • Pinch of salt

Preheat the oven to 350 degrees. Grease a 9x13 inch pan with nonstick cooking spray to prevent sticking.

Make the base + topping: In a large bowl, use a fork to mix together the oat flour, oats, brown sugar, cinnamon, baking soda and salt. Add in melted coconut oil and vanilla extract and stir until a nice crumble forms and dough begins to clump together. 

Place 2/3 of the mixture into the prepared pan and place the remaining mixture into the fridge. We’ll use that for the topping. Use your hands to evenly press the dough to the bottom of the pan.

Make the filling: Place a medium pot over medium heat. Add in the rhubarb, berries, maple syrup, vanilla extract, cornstarch and salt. Use a wooden spoon to press down and break down the blueberries just a bit. 

Bring to a boil, then reduce heat and cook for 3-5 more minutes until mixture is thickened up and nicely coats the back of a spoon. 

Pour mixture over the crust and use a spoon to evenly spread.

Bringing it all together: Take the remaining topping out of the fridge. By now there should be some nice crumbles that have clumped together. Sprinkle the topping over the rhubarb-berry filling. 

Bake for 30 minutes or until filling is bubbly and topping is golden. 

Allow bars to cool completely on a wire rack before transferring to the fridge to chill. Bars are delicious served at room temperature or straight out of the fridge. Use a sharp knife to cut into bars before serving.

The bars are delicious served at room temperature or straight out of the fridge. I recommend storing in the fridge for optimal freshness.

In Food: More Sweet Things
Comment

Whole Wheat Sourdough Discard Banana Muffins with Toasted Pecans

April 20, 2024 Jenna Hazel

Phew, that may be the longest recipe title I’ve used to date. BUT I feel equally excited about all of those elements of the recipe that I felt like I had to just lay it all out there at the beginning.

These muffins were born out of my necessity to get rid of 200g of sourdough starter as well as 5 very ripe bananas — both common things I find myself in abundance of.

I opted for a muffin, but this could have definitely been turned into a cake with the addition of a lightly sweetened cream cheese frosting, BUT to keep the recipe nutrient dense I kept them as muffins and opted to use whole wheat flour. Specifically I used Sunrise Flour Mill Heritage Whole Wheat Flour because it is more nutrient dense than traditional whole wheat flours. Heritage wheat is more digestible which is great for everyone, but espeically those who struggle to process gluten normally.

To give the muffins texture I wanted to add some chopped pecans, but once I started chopping them I remember that the only thing better than a regular pecan, is a toasted pecan. So I toasted the pecans in the oven. It only took an extra 10 minutes, but helped build more flavor.

The last thing I did was ferment the batter by leaving it in the fridge for 24 hours prior to baking it. This allowed the batter to build up a more complex flavor profile and break down some of the gluten in the bread — making it easier to digest.

I hope you like this recipe and find it to be a nice option the next time you find yourself with a lot of sourdough starter and a lot of bananas.

Whole Wheat Sourdough Discard Banana Muffins With toasted Pecans

Makes 18 standard size muffins

  • 200g sourdough discard, does not need to be active

  • 2 eggs

  • 1/2 cup honey

  • 1/2 cup unsweetened applesauce

  • 5 very ripe bananas, mashed (It’s imperative that these be really ripe to provide adequate sweetness)

  • 1 teaspoon vanilla

  • 1 1/2 cups (200g) whole wheat flour, I like to use Sunrise Flour Mill Heritage Whole Wheat to maximize the nutritional value

  • 2 teaspoons cinnamon

  • 1 teaspoon baking soda

  • 1 teaspoon baking powder

  • 1 teaspoon salt

  • 1 1/2 cups pecans, chopped - reserve a few for topping the muffins

Step 1) Mash bananas in a bowl until they are smooth.

Step 2) Mix the sourdough starter, 2 eggs, honey, vanilla extract and applesauce in a bowl. Whisk together until well combined.

Step 3) Stir the mashed banana into the liquid ingredients.

Step 4) In a separate bowl mix together whole wheat flour flour, salt, cinnamon, baking powder, and baking soda.

Step 5) Now pour the liquid ingredient mixture into the dry ingredients. Gently fold together until just mixed. It’s important not to overmix or the muffins will be tough instead of the nice tender texture we are going for.

Step 6) Place the mixture in the oven overnight or up to 24 hours. This step is optional, but I like the sour flavor that the overnight fermentation imparts to the muffins. I’ve baked it without letting them set overnight

Step 7) Preheat oven to 350F. Place muffin tin liners in a 12 hole muffin tin. Spray muffin liners with avocado oil to prevent the muffins from sticking.

Step 8) Remove the mixture from the oven and spoon into greased muffin tin, filling each muffin tin 3/4 of the way. This recipe will fill a 18 hole muffin (each hole around ¾ full). Sprinkle each muffin with a few of the remaining toasted pecans.

Step 9) Bake at 350F for approximately 18 to 20 minutes or until muffins are golden brown. My oven tends to run a bit hot so yours might not take quite as long.

In Food: Bread, Food: Breakfast, Food: More Sweet Things
Comment
Older Posts →
 

Hi! I’m Jenna — a creator, photographer, foodie, + travel enthusiast trying to bring some light and joy to this space! Welcome to my little corner of the internet where I share all things food + travel. Pour yourself a cup of coffee and take a look around!

GET ON THE LIST

Stay in the know! Sign up to be notified of new posts + get email exclusive content!

Your inbox will thank you.

Thank you!
To give Thanksgiving the respect it deserves I’ll keep the recipe for these slightly more Christmas-y cookies on lock down a week longer, but after that it’s free game. 🍪

If you’d like the recipe for these Rosemary Brown Butter Ch
A GIANT PUMPKIN POP TART WITH A BROWN SUGAR ICING is live on the blog! ✨

With Thanksgiving arriving in less than 2 weeks I’ve been dreaming up a dessert that feels like a good balance of both fun and tradition. This giant pumpkin pop tart brin
I had the best weekend eating (+ drinking) my way around Chicago! ✨ It always makes me so happy to be back in this city that grew me so much in my early 20’s — what a privileged to return and reflect on the ways I’ve grown and chang
NEW BLOG POST: Our favorite coffee, food, + sights in Omaha, Nebraska. 

There are truly so many places we love in Omaha! After living here for 6 years it felt like time to round up our top picks and share it with all of you. Hop over to the blog to
Fall in the neighborhood. ✨
Broccoli, couscous, pistachios, pumpkin seeds, + feta tossed with a lemon turmeric dressing for a nourishing lunch. ✨
A quick little 24 hour trip to hang with my mom. ❤️
Harissa chicken hummus plates ✨
Back on my Greek omelet kick! They’ve been such a great breakfast that has felt both fresh and nutritious! 

I added Kalamata olives, tomatoes, mint, basil, and feta in this time, but it could easily maintain the Greek vibe with some red bell p