• blog
  • about
  • Email List
  • Archives
Menu

HAZEL HAUS

Street Address
the best things in life are edible
Phone Number
A Food + Travel Blog

Your Custom Text Here

HAZEL HAUS

  • blog
  • about
  • Email List
  • Archives

Nutella + Raspberry Linzer Cookies for Valentine's Day

February 12, 2024 Jenna Hazel

Happy Valentine’s Day friends!

Josiah and I decided to do our Valentine’s date early this year because of our schedules. We deviated completely from our usual asian cuisine and ended up at one of our favorite Omaha spots, Lyle’s Pizzeria. It’s so, so yummy! We got their pesto roll (which made me rethink my hesitation toward pesto — another story for another day) and their Bianco pizza, a white sauce pizza. Then we went to Dry Spokes, a craft mocktail and non-achoholic spirits bar to close out the night. It was our first time at Dry Spokes, but I am certain it won’t be our last. It was a definite treat.

Another treat, these Nutella + Raspberry Linzer cookies are the last minute treat you need to round out your Valentine’s Day celebrations.

Whether you’re looking for something to send with your kids to school or surprise a loved one with, I’ve got you covered. These linzer cookies come together quick, but feel elevated. If you don’t have this specific cookie cutter do not fret. You can use a biscuit cutter or another round cookie cutter and just make a on the top cookie pieces. They will likely be less precise, but that’s totally fine! We’re never looking for perfect over here.

I hope you have a lovely Valentine’s Day.

Happy Baking!

Raspberry + Nutella Linzer Cookies

Makes 16 Cookies

  • 1 1/2 cups unsalted butter at room temperature

  • 1 cup sugar

  • 1 tsp pure vanilla extract

  • 3 1/2 cups all-purpose flour

  • ¼ tsp salt

  • 1/4 cup raspberry jam

  • 1/4 cup Nutella
    Confectioners’ sugar, for dusting


In the bowl of an electric mixer fitted with the paddle attachment, mix together the butter and sugar until they are just combined. Add the vanilla. In a medium bowl, sift together the flour and salt, then add them to the butter-and-sugar mixture. Mix on low speed until the dough starts to come together. Dump onto a surface dusted with flour and shape into a flat disk. Wrap in plastic and chill for 30 minutes.

Preheat oven to 350 degrees Fahrenheit.

Roll the dough to ¼-in. thick and make 2¾-in. cutouts with a plain or fluted cutter. With half of the cutouts, use a 1-in. cutter to remove the middle. I used this specific linzer cookie cutter, but use whatever you have to make a round cookie and then use something to remove the center. (a straw perhaps?) or just cut a slit on the top cookie. Pictured below.

Bake the cookies for 12-14 minutes or until the edges begin to brown. Allow to cool to room temperature. Spread raspberry preserves or nutella on the flat side of each solid cookie. Dust the top of the cutout cookies with confectioners’ sugar, and press the flat sides together, with the raspberry preserves in the middle and the confectioners’ sugar on the top.

Here is a photo of what I recommend doing if you don’t have a heart specific cookie cutter to cut the center out.

In Food: Brownies + Cookies
2 Comments

Nutella Knots

January 28, 2024 Jenna Hazel

When I first learned about Nutella, it was all I wanted. Heck, it’s all I thought about. Nutella on toast. Nutella on apples. NUTELLA ON EVERYTHING.

Well somewhere along the lines I kind of stopped using it all. Probably a result of many dieting publications claiming it was awful for you.

Well, to hell with that! I’m back on the nutella game and man do we have a lot of catching up to do.

So many years wasted thinking it was bad.

So, so grateful to have worked to make a mindset shift that feels much more free. I might even venture to claim it’s nourishing. Too far? Okay, I’m not claiming it has any nutritious value per say, but it can still be nourishing. Maybe not in the same way a kale salad is, but in the way that it makes my heart happy — it’s nourishing my soul.

And since I claimed nourish as my word for 2024, I can see a lot of Nutella in my future.

These Nutella knots were born out of my rekindled love affair with the iconic chocolate-hazelnut spread and I can guarantee you will LOVE them. I recently added them to the Hazel Haus Bake Shop menu, but since so many of you don’t live within driving distance I wanted you to be able to have a taste of them in your own kitchen.

Don’t be intimidated by how long the dough takes to sit in the fridge. Just plan ahead.

Don’t get tripped up on how to tie them into knots. I have photos below, but if you need a little extra help I recommend this video. Don’t worry about being perfect. Just jump in and have fun.

I hope you enjoy. <3

Nutella Knots

Makes: 8 knots

Recipe for the dough is by Alison Roman

For the dough:

  • 1 cup whole milk

  • ¼ cup sugar

  • 2 ¼ teaspoons active dry yeast

  • 3 ¾ cups all-purpose flour (540g)

  • 1 ½ teaspoons baking powder

  • 1 ½ teaspoons kosher salt

  • 2 large eggs

  • 1/2 cup unsalted butter, room temperature, cut into ½” pieces

For the filling:

  • 1 cup nutella

Additional:

1 egg, whisked for brushing on knots prior to baking

Directions:

  1. Whisk whole milk, sugar, and yeast together in the bowl of a stand mixer fitted with the dough hook attachment. 

  2. Add the flour, baking powder, and salt. Mix on low speed until the dough starts to come together into a dry, shaggy mess. Add the eggs, one at a time, and mix on medium speed until you’ve got a smooth, sticky dough with no visible dry spots.

  3. With the mixer running, add the butter a few pieces at a time, letting the butter incorporate before adding more pieces. Eventually, the dough will take all the butter, disappearing into a silky, sticky dough. Knead this on medium speed for 3 to 4 minutes to continue to develop the gluten.

  4. Transfer the dough into a greased, medium bowl and immediately cover with plastic wrap. Place in the refrigerator for 12–24 hours (during this time, the dough is slowly rising which develops great flavor, the flour is hydrating which firms the dough up, and the butter is resolidifying, making everything easy to roll out). I have done this after only leaving it in the fridge for 6 hours and it works, but the dough isn’t as ideal to work with. So if you’re wanting nutella knots faster, there is that option, but know that the dough might be tougher to work with.

  5. Transfer the dough to a lightly floured work surface. You might want to leave it at room temperature for 10-15 minutes if it's really cold and difficult to roll out.

  6. With a rolling pin, roll the dough into a 19x12in rectangle.

  7. Evenly spread out the nutella using an offset spatula.

  8. Grab one of the long sides of the rectangle and fold it down to cover 2/3 of the dough, then grab the other side and fold it over the top (see pictures above for reference).

  9. Go over the dough a couple of times with a rolling pin to even out the sides.

  10. Use a sharp knife or bench scraper to cut the dough into 8 strips, roughly 2 inches each.

  11. Split each strip into three, leaving one side joined. Braid the strips to create a three-stranded plait. Grab the end of the plait and roll it up to create a bun—place all the shaped buns on a baking sheet lined with parchment paper. Cover with plastic wrap and allow the buns to rise for 20-30 minutes or until they have almost doubled in size.

  12. Preheat oven to 350 degrees.

  13. Remove the plastic wrap and gently brush the knots with the whisked egg.

  14. Bake at 350 degrees for 20-25 minutes or just until golden brown. Remove from the oven and enjoy!

Note: These freeze beautifully so feel free to bake a bunch and then place them in a freezer safe container once they are completely cooled and enjoy for many days to come.

In Food: More Sweet Things, Food: Bread
Comment

Jaden's Sourdough Bread

January 15, 2024 Jenna Hazel

In Fall of 2022 my sister taught me how to make sourdough bread. Since then, anytime I post a picture of my sourdough experiments I’ve had someone ask me for tips/tricks/advice on making sourdough bread at home. The truth is, i’m not an expert — not even close. BUT because you all have been so interested in the subject I figured i’d turn to the person i know that is an expert — my sister, Jaden.

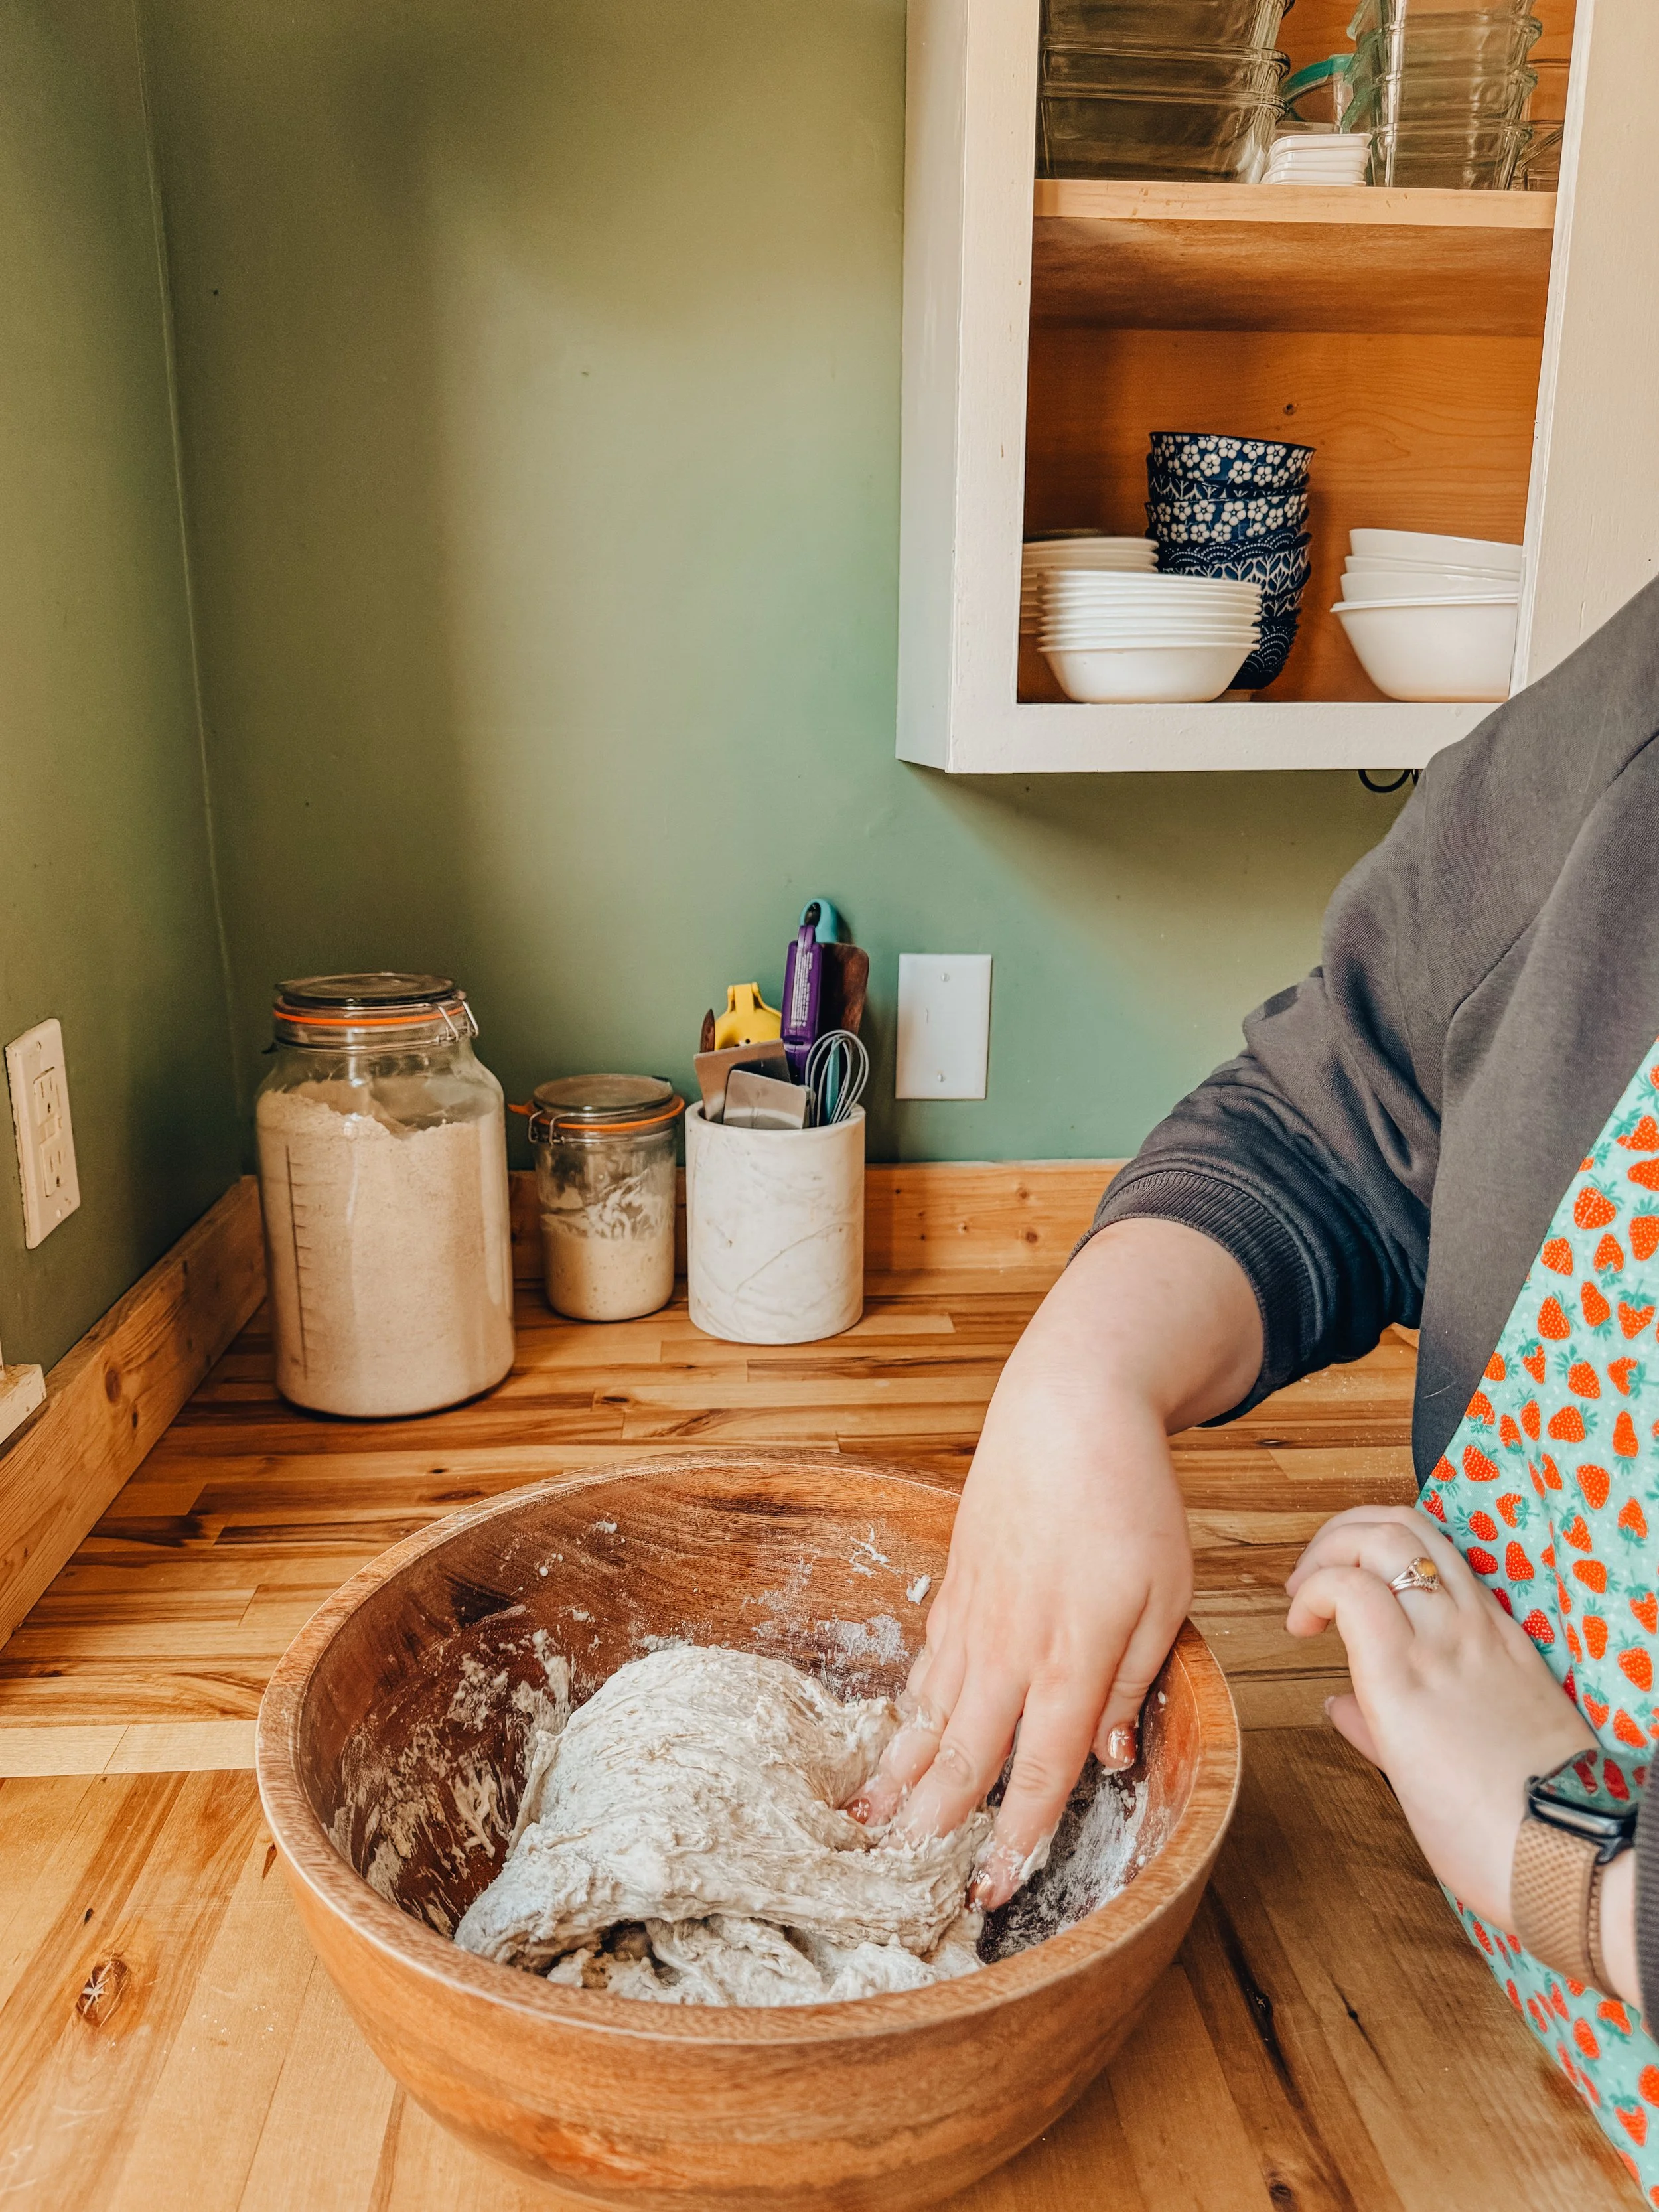
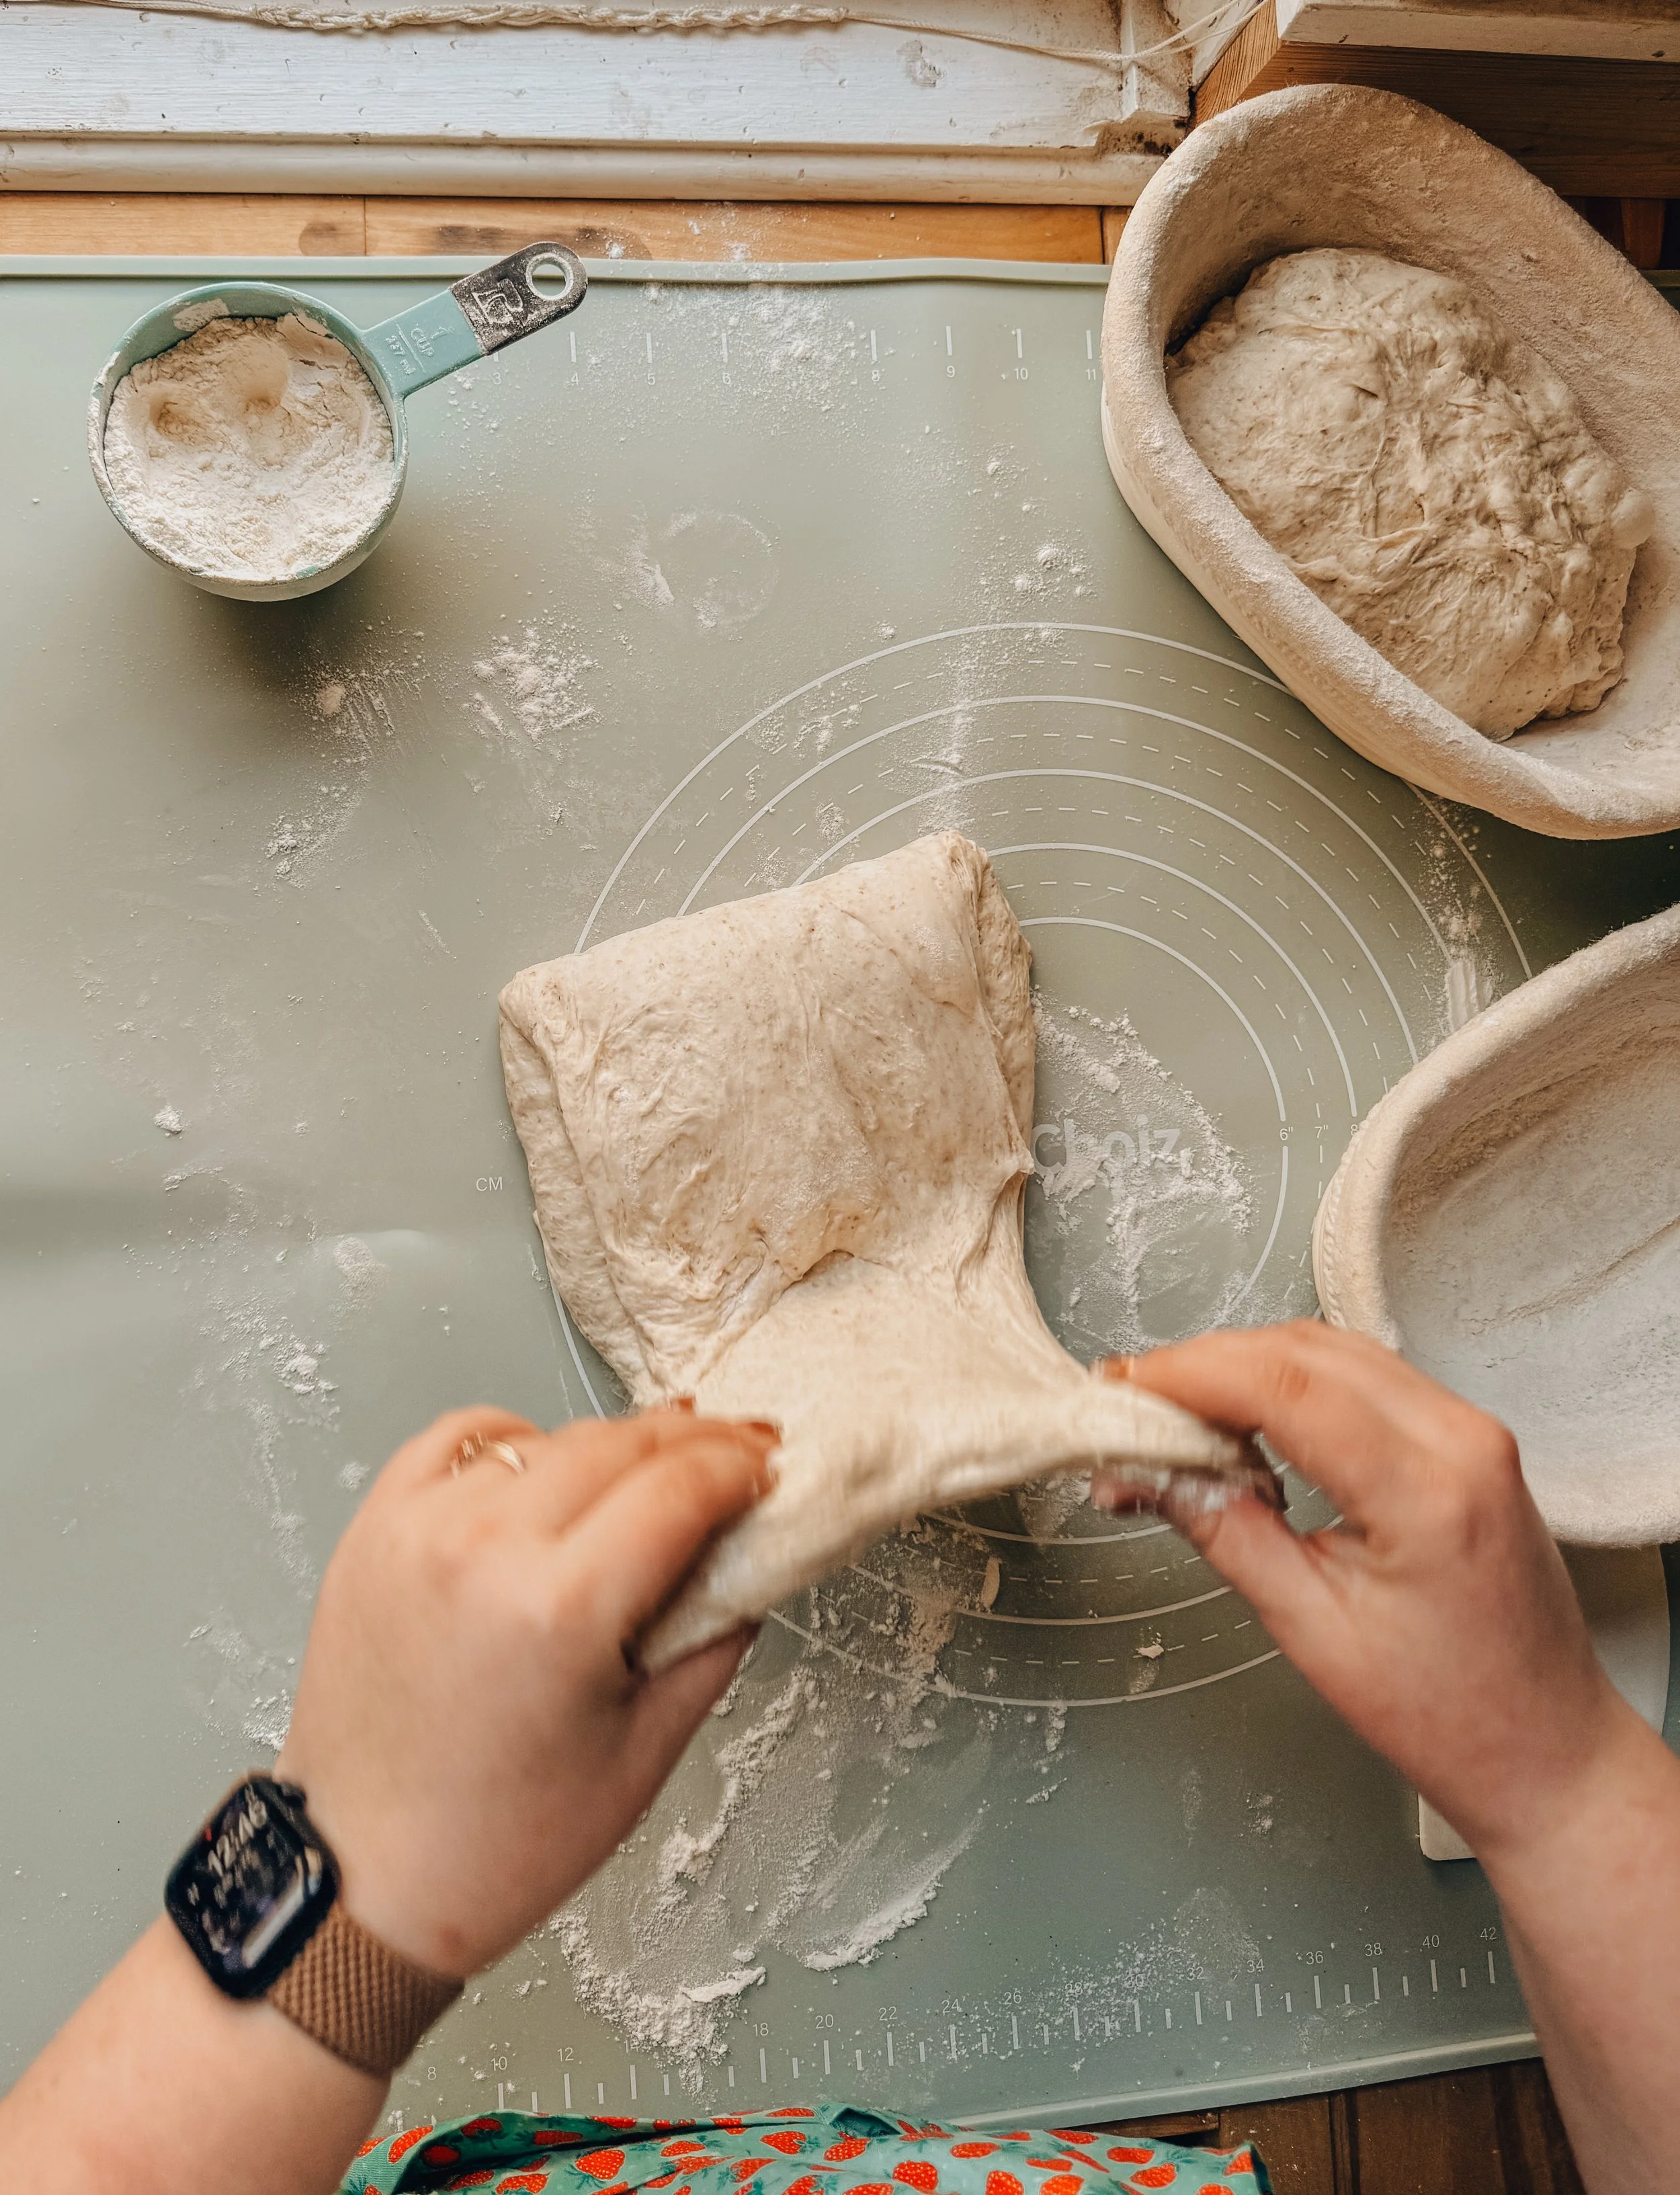
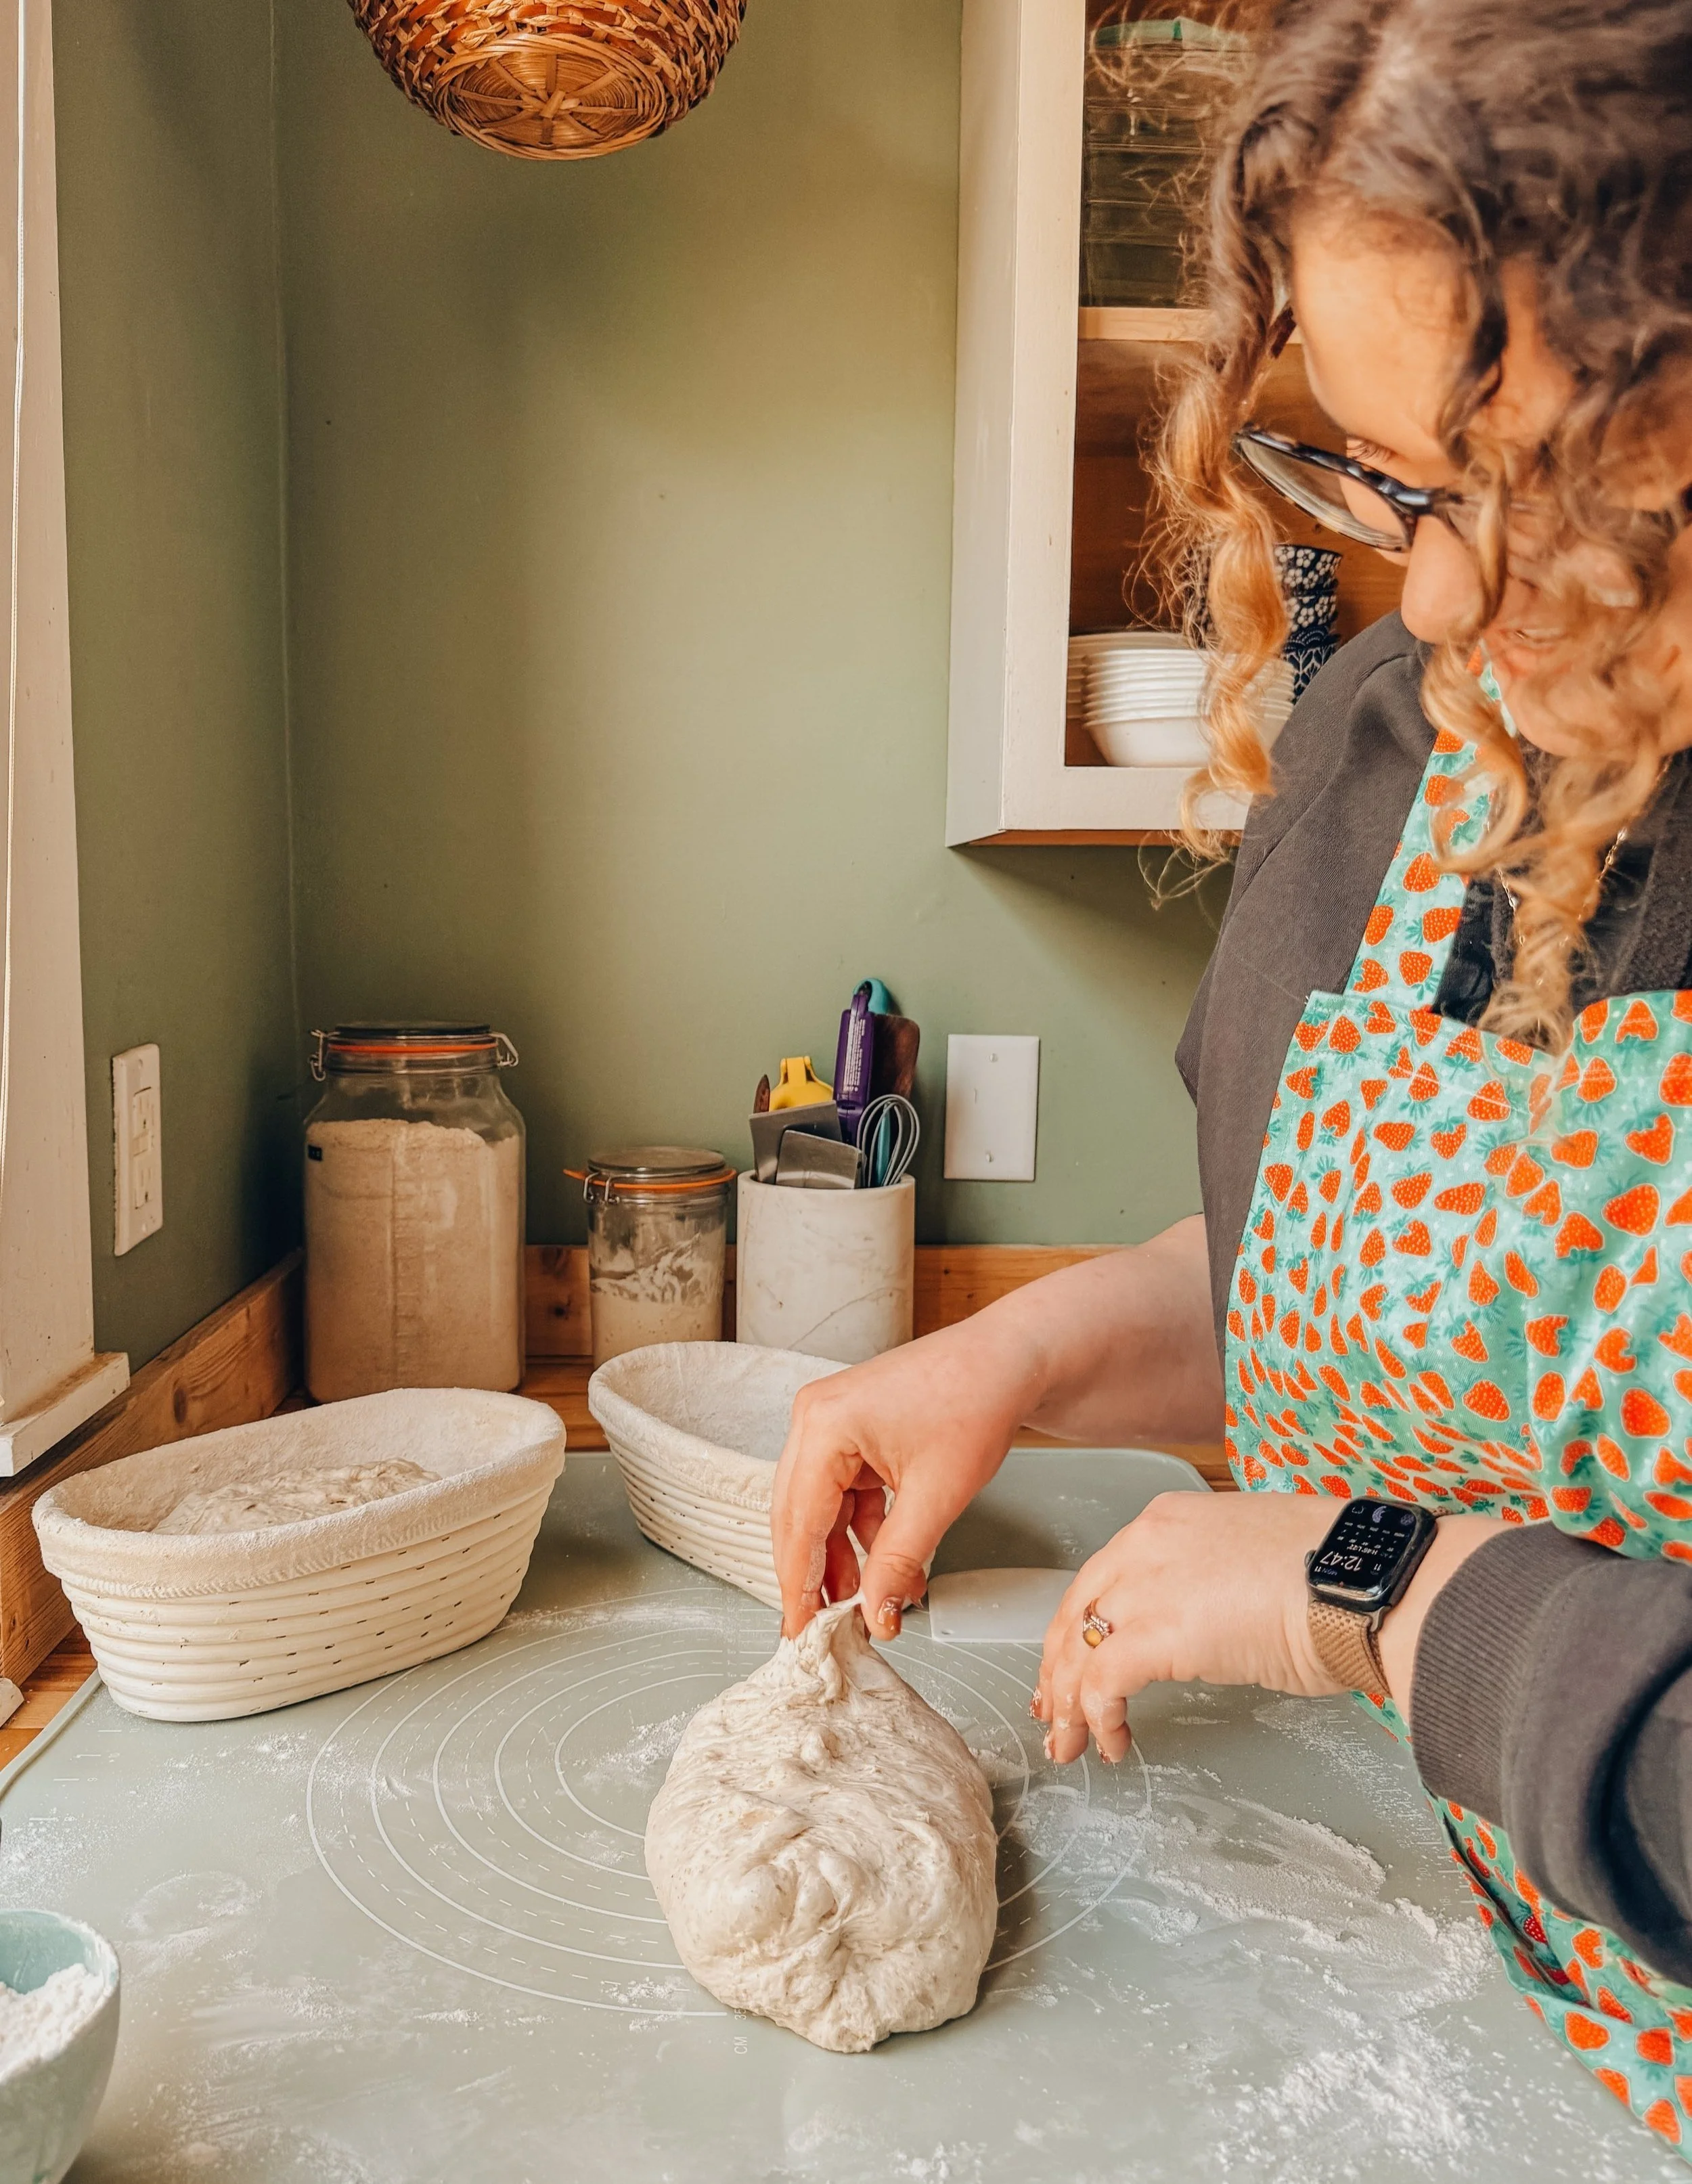
She graciously let me into her light-filled kitchen a few weeks ago and answered a few of my questions about her tips and trick on how you all can embark on your very own sourdough bread journey. Since the techniques used are much more easily understood visually I tried to capture as many photos as possible of the kneading and shaping stages to make it easier to understand. I hope you leave this post feeling inspired and ready to get baking!

Without further ado, here’s my sister’s sourdough bread journey, recipe, and tips/tricks.

How did you get into baking?

Jaden: While on my honeymoon, we spent time in Airbnbs and tried to cook dinner and breakfast to save money. It was safe to say I had no idea what I was doing. I burnt most things and everything tasted awful. I even ruined a pan of one of the ladies we were staying with. Daniel graciously ran to the store and bought her a new one and we all had a good laugh about it afterwards. Once we settled in a few months later, I was trying to decide if I wanted to go back to school. I also was new to the area so I was trying to find an avenue to make new friends. Daniel suggested I go to culinary school (Obviously for my benefit as well as his).

So I enrolled in our culinary program here in Omaha. They go through and they talk about the two sides of culinary- pastry and culinary. The intro course explained that pastry students almost never make it past the first quarter. This was partially because of the difficult of the subject, but also because the head Chef was a very difficult professor. Obviously, I was so drawn to how difficult and terrible pastry sounded, so I went with that. I don't think I could have ever prepared for how hard it was going to be, but also how fun. Yes, I cried in the walk in multiple times before, during, and after many practical's, but I also laughed until I cried with the people who I shared those classrooms with. We would spend 8-9 hours together in a kitchen, so friendships were formed quickly. What drew me to baking was initially a desire to make friends and to learn a skill that I knew I'd use everyday, but it turned into a full on obsession very quickly.

What drew you to sourdough?

Jaden: If you go back, you remember I said the head chef of the pastry department was difficult. She would not shy away from telling you what you spent hours working on looked, tasted, smelled, or "gave an overall sense of" terrible. She did not soften her words and she did NOT give out compliments unless it was perfection.

I interacted with this teacher for almost a year in all my classes, getting lots of "Jaden, rustic is not a style. This just looks like shit" and things like that, but never compliments. My friends kept my spirits up, even though I would never say cakes or chocolates were something I was good at. I was never an incredibly student in the kitchen. I really struggled and felt I never made things look quite good enough or pretty enough. I just kept going, thinking I was just going to be "okay" at everything. Well, then came breads class. I went in with the same expectations of being in the middle of the class, only to find bread is probably the only thing I would excel at. Bread is long considered to be the most difficult thing to master. Ever heard of Bread Week on Great British Baking Show? Absolute fear in those contestant eyes as Paul Hollywood prowls around their work stations. Terrifying. So I was nervous about the class, but ended up loving it.

I had one of my chefs take my focaccia to the main kitchen that served the public and tell them they needled to learn how to make it from me. I was absolutely flabbergasted. My head chef was also blown away because it took her by surprises as much as me. While others struggled as I did on every single other class, I soared to the top of the class. Why was I so good at bread? I have no idea. I hate perfection and do not like rules- both of which I've always heard you had to have in order to be good at pastries (especially bread).

I think what I like about bread is that once you know what the recipe should feel like, smell like, or look like, you can really just throw all caution to the wind. I never measure or read a recipe because I know if I add to much water I'll throw more flour in there and its fine. I don't think there's any other pastry that can be that flexibly. I also love that you don't have to frost or decorate bread. Frosting cakes is a waste of time to me and Christina Tosi and her "Naked Cake" revolution to spite her pastry chef from school is an inspiration to me. Truly Iconic. Sourdough is the queen though. There's something about spending hours kneading and folding a dough that makes it that much better. It also is such an impressive looking piece once it comes out of the oven.

What are your three top takeaways for making sourdough at home?

Jaden:

  1. Do not let the online pictures fool you. Sometimes SD is big and has crispy beautiful crust and tall, bending ear. But sometimes its a little on the flat side. They all taste the same! Don't pick and choose what you share or take to a party- they're both good!

  2. You can fit sourdough into any schedule. You control your dough, not the other way around. Use your fridge to extend stages by slowing down the yeast.

  3. Please, for all that is good and holy, just put your starter in the fridge. Don't feed it everyday unless youre making bread on a weekly basis. If you are not using it, put it in the fridge. Mine has lived in there for almost 8 months. Just give it 4-5 feedings after taking out before using and good as new!

Favorite Items for Baking SD at home?

  • Oval Bread Banneton

  • Bread Lame

  • Pizza Peel

  • Bread Pan or a Dutch oven

  • Bench Scraper

  • Pastry Mat

  • Silicon Pastry Brush

  • Mini Silicone Mats

The Stretching and Folding

The Shaping

Scoring the Bread

Jaden’s Sourdough Bread

Makes 2 medium Loaves

Feeding the Starter

  • 3 oz starter

  • 4 oz water

  • 4 oz bread flour

Step 1) Feed your starter daily if you’re going to be using it, but if you can’t use it for a while just put in the coldest part of your fridge until you want to use it again. Then remove it from the fridge and feed 8-24 hours before you want to bake bread.

Making the Bread

Levain:

  • 1 oz Starter

  • 4.78 oz Bread Flour

  • 5.32 oz Water

Step 2) Make the levain the night before by combining the starter, bread flour, and water. Cover. Allow the mixture to sit on the counter until the following morning or at least 8 hours.

  • 22 oz bread flour

  • 4.5 oz dark Rye Flour

  • 0.69 oz salt

  • 16-18oz water

  • rice flour for sprinkling on bannetons

Step 3) Add the 22 ounces of bread flour, 4.5 ounces of rye flour, salt, and water to the levain. Mix together until mostly combined. I like it to be on the more dry side as the flour will absorb the water as it sits. Let sit with slightly damp towel over it for 30-45 min.

Step 4) Stretch and fold the dough. Essentially you’re picking up the dough from one side, stretching it up, and then tucking it gently to the other side of the dough. The photos above demonstrate this well. Let the dough sit for 30-45 min. Repeat the stretching and folding until the dough is stretchy and smooth. This is how you’re developing the gluten in the bread that will give the bread structure. Usually repeating the stretching and folding process three times will get it to where you want it to be.

Step 5) Place the dough in a large bowl, cover and place in fridge for 24-36 hours.

Step 6) This is where we shape our loaves. Lightly sprinkle a little rice flour on the bannetons first to ensure your bread does not stick. Then begin shaping the dough by dividing the dough in half. Following along with the photos above. Starting on the left (or right) side, stretch the dough outward and fold it over toward the center. Repeat on the opposite side. Stretch and fold the dough from the bottom to the center. Repeat on the top. Roll the dough up from the bottom and then pinch the seam of the loaf with your fingers to seal it up. This will keep the gas from escaping during the proofing process. Place the dough in a banneton with the seam side up.

Step 7) Allow the dough to ferment in a proofing bag in the fridge (24-36 hours) (Jenna uses these shower caps to cover her bread while it its in the fridge instead of using a bag and they work great!)

Step 8) Preheat oven at 500 degree with Dutch oven or bread pan inside for 1 hour.

Step 9) Remove the bread from the proofing bag and turn upside down onto a piece of parchment paper or a silicon mat. Score the bread by using either a very sharp knife or a bread lame to cut a slit on one side of the loaf. There are lots of fun pattern inspiration out there so feel free to go crazy! It’s main purpose is just to give the heat a place to escape to while baking. Remove the bread pan or Dutch oven from the oven, place the bread inside inside (BE CAREFUL) then place lid back on.

Step 10) Bake for 15 mins with the lid on then remove lid.

Step 11) Turn the oven down to 450 degrees and Bake for 15 mins or until it has a nice and dark crust.

Step 12) Remove the bread from the Dutch oven and let cool on a wire rack completely before you cut into it.

Repeat with second loaf

In Food: Bread
Comment

Nourishing Breakfast Cookies You’ll Be Baking All Winter Long

January 10, 2024 Jenna Hazel

In 2024 I’m not making any resolutions. The pressure to avoid this or that in hopes of drastically changing my life — it just doesn’t feel good.

Instead, I’ve picked a word to guide my year — nourish.

I want to make choices that feel nourishing — step into friendships that feel nourishing, choose joyful movement that feels nourishing, and eat meals that feel nourishing.

Just looking to feel nourished all around.

These breakfast cookies are the perfect nourishing treat to get this year started off right. They’re soft, only slightly sweet, topped with sea salt (which is always a win for me!), + freeze perfectly so you can make them once and have them available all month long. They come together in just a few minutes and will have you feeling ready to take on the days ahead.

I hope you enjoy.

Nourishing Breakfast Cookies

Makes 24 cookies

Adapted slightly from Ambitious Kitchen

  • 4 large extra ripe bananas, mashed

  • 1 cup almond butter

  • 1/2 cup pure maple syrup

  • 2 large eggs

  • 2 teaspoons pure vanilla extract

  • 2 cups oat flour

  • 1/4 cup + 2 TBS flaxseed meal

  • 1 teaspoon ground cinnamon

  • 1 teaspoons baking soda

  • 1/2 teaspoon kosher salt

  • 2 cups old fashioned rolled oats

  • 1/2 cup semi-sweet chocolate chips

  • 1/3 cup shredded coconut

  • 2/3 cup chopped pecans

  • Topping:

  • Flaky sea salt, for sprinkling (don’t skip this, it’s so, so yummy!)

    Preheat the oven to 350 degrees F. Line a large baking sheet with parchment paper; set aside.

    To a blender, add the mashed bananas, nut butter, maple syrup, egg, and vanilla extract. Blend until smooth and well combined.

    Add the oat flour, flaxseed meal, cinnamon, baking soda, and salt to a large bowl. Then pour the wet ingredients into the dry ingredients. Stir by hand until just combined. Stir in the oats, coconut, chocolate chips and pecans. Allow the dough to sit for 5 minutes while you clean up and put away your ingredients. This will allow the flax seeds to work their magic and be able to hold the cookies together.

    Use a large cookie scoop to scoop the dough onto prepared baking sheets, about 3 tablespoons dough per cookie. Then using a spatula covered in parchment paper, gently press the cookies down until they are about 1/2 inch thick. Top each cookie with a few extra chocolate chips.

    Bake for 10 to 14 minutes or until they’re set, but still soft.

    Remove from the oven and sprinkle with flaky sea salt. Don’t skip this step. It makes them extra, extra delicious. Cool on the baking sheet for 5 minutes and then transfer to a wire rack to cool completely. Enjoy!

Notes:

Make sure you use really ripe bananas. I’m talking like black spots alllllll over. This will make sure that the cookies have the proper level of sweetness.

For Freezing: Once these have cooled completely you can place the cookies in a freezer safe container and freeze for up to 3 months. I like to take them out one at a time and warm up in the microwave whenever I want a nourishing breakfast on the go or afternoon treat.

In Food: Breakfast, Food: Brownies + Cookies
3 Comments
← Newer Posts Older Posts →
 

Hi! I’m Jenna — a creator, photographer, foodie, + travel enthusiast trying to bring some light and joy to this space! Welcome to my little corner of the internet where I share all things food + travel. Pour yourself a cup of coffee and take a look around!

GET ON THE LIST

Stay in the know! Sign up to be notified of new posts + get email exclusive content!

Your inbox will thank you.

Thank you!
To give Thanksgiving the respect it deserves I&rsquo;ll keep the recipe for these slightly more Christmas-y cookies on lock down a week longer, but after that it&rsquo;s free game. 🍪

If you&rsquo;d like the recipe for these Rosemary Brown Butter Ch
A GIANT PUMPKIN POP TART WITH A BROWN SUGAR ICING is live on the blog! ✨

With Thanksgiving arriving in less than 2 weeks I&rsquo;ve been dreaming up a dessert that feels like a good balance of both fun and tradition. This giant pumpkin pop tart brin
I had the best weekend eating (+ drinking) my way around Chicago! ✨ It always makes me so happy to be back in this city that grew me so much in my early 20&rsquo;s &mdash; what a privileged to return and reflect on the ways I&rsquo;ve grown and chang
NEW BLOG POST: Our favorite coffee, food, + sights in Omaha, Nebraska. 

There are truly so many places we love in Omaha! After living here for 6 years it felt like time to round up our top picks and share it with all of you. Hop over to the blog to
Fall in the neighborhood. ✨
Broccoli, couscous, pistachios, pumpkin seeds, + feta tossed with a lemon turmeric dressing for a nourishing lunch. ✨
A quick little 24 hour trip to hang with my mom. ❤️
Harissa chicken hummus plates ✨
Back on my Greek omelet kick! They&rsquo;ve been such a great breakfast that has felt both fresh and nutritious! 

I added Kalamata olives, tomatoes, mint, basil, and feta in this time, but it could easily maintain the Greek vibe with some red bell p